Running your toolkit
Practice Handbook
Set up and look after your practice's own handbook of procedures, contacts and rotas.
- Practice admins
The Practice Handbook holds how your practice runs: who is on call, what to do with a discharge letter, how repeat prescriptions are handled. This page covers setting it up and keeping it current. For what staff see when they read it, see Handbook, appointments and workflows.
Turning it on
The Signposting Toolkit team switches the Practice Handbook on for your practice. Until then, Practice Handbook appears greyed out in the menu, marked Not enabled.
When the handbook is switched on and your practice has no handbook content yet, a small starter set of categories and example pages is copied in for you to adapt. The rota and pinned panel start blank. If your practice already has handbook content, nothing is copied and nothing is overwritten.
Who can see and edit it
There’s nothing to switch on for each person: once the Practice Handbook is on, everyone at your practice can read it.
- Any signed-in member of your practice can read handbook pages in categories that are visible to them.
- Practice admins can edit every page and change every setting.
- A category’s editors look after it: they can add pages and lists to the category and its subcategories, and edit them (see Letting a team look after a category).
- Standard users can’t open the handbook settings. They can edit a page only if an admin has named them as an editor for that page (see Letting staff edit a page) or for its category. Anyone who can’t edit a page can tell you about a problem with it (see Problems reported by staff).
The top of the handbook settings shows how many people can read the handbook and how many categories are restricted. Choose View as Standard User there to open the handbook as your team sees it. To see what one person can read and edit, open them in Users & access.
Build pages with the handbook starter
The handbook starter helps you turn information you already have into your first few pages. It is optional, and you can use it at any time, including after your practice has gone live.
Open it from Build pages with the handbook starter on the Pages tab of the handbook settings, next to Add page, from Open handbook starter under Make it your own on your setup page, or from the Practice Handbook step in the setup checklist.
- Under Already have this information?, paste existing procedures or upload a Word (.docx), PDF or plain-text file of up to 3 MB. Check the extracted text, then choose Add to my information. The original file isn’t kept. Scanned documents need selectable text.
- Choose a few topics: contacts and escalation, medication requests, patient messaging, appointments, or documents and results. If you’ve added information, Suggest topics from my information marks the topics that match it, and Select suggested topics adds them to your choices without removing any you’ve already picked. Then choose Save and continue.
- Work through the pages one at a time. Each has a title, the page wording in a rich-text editor (headings, bullet points, numbered steps and links), and a reading preview beside it. Where AI customisation is switched on for your practice, Organise selected pages with AI drafts the wording from your information and onboarding answers and lists any details for you to check.
- Check any details listed under A few details to check, then choose I have checked these details and updated the page. Use Leave this page out for pages you don’t want.
- Tick I have checked the selected pages and they are ready for staff, then choose the Add reviewed pages button (it shows how many pages it will add).
The pages go into a new Practice essentials category, visible to all practice staff. Each page’s wording becomes its Page content, ready to edit like any other page. Before you add them, the starter shows who will be able to read them: everyone at your practice. Afterwards, the handbook confirms they’re live for your team, with View as Standard User to check what staff see. If a page needs restricting, change the category’s visibility before you add anything sensitive. Include operational information only, never patient information.
Saving drafts and working with other admins
Save draft and Save and finish later keep your work for any practice admin to pick up. A saved draft is not visible to staff. The footer shows whether you have unsaved changes.
The starter only adds new pages; it doesn’t replace existing ones. If a title already exists, rename the page or leave it out.
If another admin, or another browser tab, has saved a newer draft, your save is refused rather than overwriting their work.
Admins see an invitation to use the starter on the handbook’s main page while the handbook is empty or still holds the unchanged starter content. Not now hides it for this visit; We’ve already set this up hides it for the practice. Standard users don’t see the invitation.
Manage handbook
Open the handbook settings from Manage handbook at the top of the Practice Handbook, or from Practice settings.
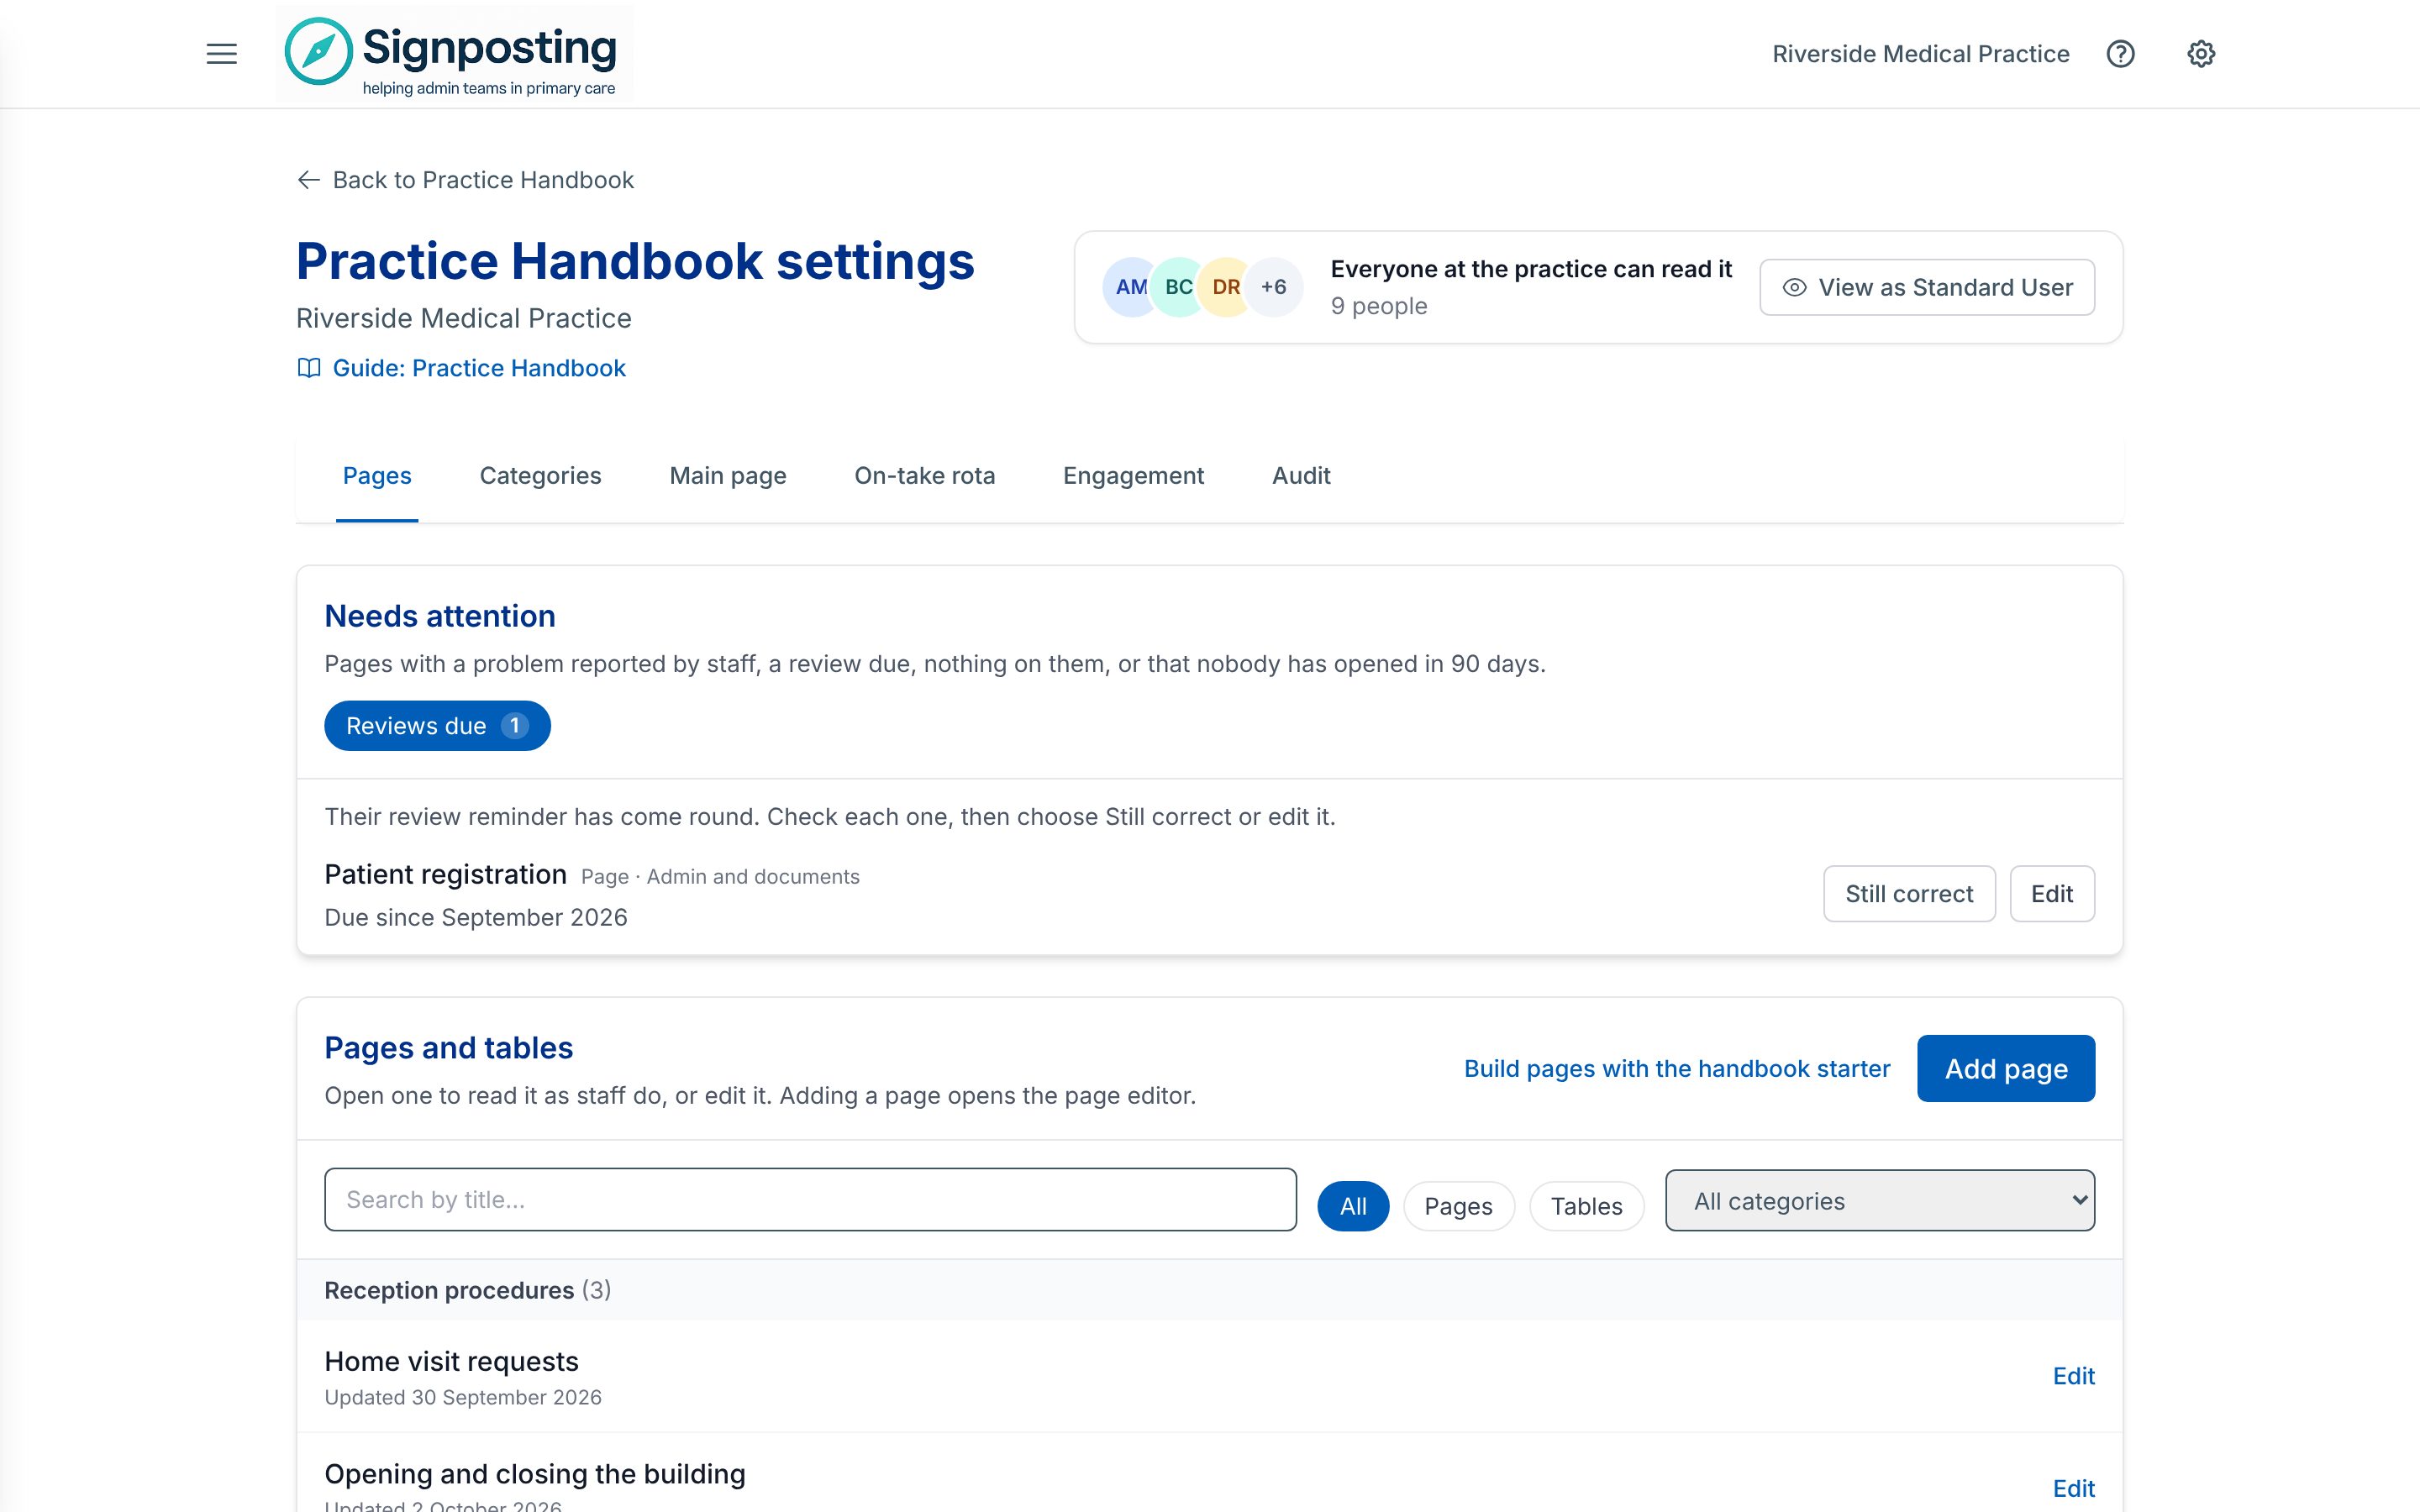
The settings page has six tabs: Pages, Categories, Main page (the quick access buttons and pinned panel on the handbook’s main page), On-take rota, Engagement and Audit. Pages starts with Needs attention, then lists every page and table by category, with a search box and filters for type and category. In a handbook with more than 30 pages and tables, each category is closed until you open it, and searching or filtering shows every match. Select a page’s title to read it as staff do, or Edit to change it. Changes take effect for staff as soon as you save. There is no clinical review step for handbook pages, so check your wording before you save.
Adding and editing pages
Pages are added and edited in one place, the page editor, whoever you are: practice admins, category editors and people named on a page all use it.
- To add a page, choose Add page on the handbook’s main page (it starts in the category you’re looking at) or on the Pages tab of the handbook settings. The editor’s heading says which category it’s going in, such as New page in Nursing, and the cursor is ready in Title. To add a table instead, choose Table beside the heading (see Page types). A new page starts from its category’s template for new pages, if it has one. If it starts empty, you can choose a layout under Start from a layout: Step-by-step procedure, Who to contact or Quick reference. Its headings go into the page for you to fill in or replace.
- To change a page, open it and choose Edit, or choose Edit beside it on the Pages tab.
Each page you can edit has ⋯ in the corner of its card on the handbook’s main page. Select it, or right-click the card, then choose:
- Edit to open the page editor
- Move to… to put it in another category: choose the category, then Move. Practice admins can move a page to any category, or to Uncategorised. Category editors can move it between the categories they look after. Moving a page counts as updating it, so it’s listed in What’s changed.
- Also show in… to show it in other categories as well as its own (see Show a page in more than one category)
- Remove from and the category’s name, on a page shown in the category you’re looking at from another one, to take it out of this category. The page stays where it lives.
- Still correct, when the page is due a review (its card says Review due), to record that you’ve checked it today (see Review reminders)
- Copy link to copy a link to the page, to send to someone
- Open in new tab
- Delete, for practice admins. You’re asked to confirm first, then Undo puts it back for a few seconds afterwards.
The editor puts the title and the page’s text first. Its settings sit beside them, or below them on a narrow screen:
- Where it lives: the page’s Category, which decides who can see and edit it, and Also show in, other categories to show it in too. Choose + Add under Also show in to pick a category, and × on one to take it out again.
- Warning badge: a short label shown beside the title and on the page’s card. Choose Important or Urgent, or Custom… to write your own, such as “Before 11:00”. None takes it off.
- Reviews: how often the page should be checked (Review reminder) and, once it’s been added, when it was Last reviewed (see Keeping pages up to date).
- For practice admins, Who can edit: who else can edit it (see Letting staff edit a page).
The bar along the bottom of the screen stays in reach however long the page is. Choose Preview to see the page as staff will, then Back to editing to carry on from where you were. Choose Save changes (or Add page for a new one) to publish it, or press Ctrl and S (⌘ and S on a Mac). Choose Cancel to leave it as it was. While you have unsaved changes, the bar says so, and the editor asks before you leave it, so nothing is lost by accident.
The rich-text editor supports headings, bold, italic, underline, NHS-palette text colours, highlights, bullet and numbered lists, and links to web and email addresses. Text pasted from Word or Google Docs is tidied up automatically.
To delete a page, practice admins open it and choose Delete. For a few seconds afterwards, Undo puts it back as it was.
Page types
Guidance pages
A guidance page (Guidance page when you add it) suits policies, procedures and anything that needs explaining. It has:
- Page content: the main text, shown first.
- Role cards, if you add them: a set of cards with steps for particular roles, such as receptionist, HCA, nurse or GP. Choose Role cards under the page content to add them, give each card a title and responsibilities (one per line), and choose a grid or row layout.
- Notes at the bottom, if you add them: extra guidance below the role cards, such as exceptions, caveats or links. Choose Notes at the bottom under the page content to add them.
Remove beside the role cards or the notes takes them off the page when you save. If there’s anything in them, you’re asked first.
Staff see how the page starts on its card in the handbook, and handbook search looks through all of it. Older pages, and the example pages copied in when the handbook was switched on, show their text under Notes at the bottom when you edit them.
Lists
A list (Table when you add it) is an editable table for information that changes often and needs no explanation, such as the duty rota, on-call numbers or frequently called departments. After adding it, you set up its columns in the page editor: add, rename and reorder them, and choose a type for each (text, notes, phone, email or link). Column changes are saved straight away.
Handbook search looks through every row, so staff can find a number by typing who it’s for. People who can edit a list can add, change and delete rows from the list itself on the staff page, using Add row, without opening the handbook settings. This makes it practical for a receptionist to keep the rota up to date. They can also set up its columns from Edit on the list.
Images, attachments and PDFs
Images
Anyone who can edit a page can add images to Page content and Notes at the bottom. Use the image button in the editor toolbar, choose a JPG or PNG file of up to 2MB, and add alt text describing the image for screen readers (leave it blank if the image is only decorative). The image goes in where your cursor is.
Good uses include floor plans, annotated screenshots of practice systems, equipment photos and process diagrams. Images scale to fit the page and the reader’s screen, and readers can click an image to view it full-screen and zoom in.
Attachments
Each page has an Attachments section. Anyone who can edit the page can add:
- a Link to a document stored elsewhere, such as a shared drive or intranet page, with Add link
- a PDF of up to 4MB, with Upload PDF and then Upload and attach; it opens in the browser’s PDF viewer
To link to an uploaded PDF from within the page text, upload it as an attachment first, copy the address of its Uploaded PDF link, then paste it in with the editor’s link button.
Who can open them
Uploaded images and PDFs are private to your practice. Only signed-in members of your practice can open them, and those on a page in a restricted category follow that category’s visibility. A link attachment goes wherever its address points, so access to it is controlled by that site, not by the toolkit.
Categories and visibility
Set up categories on the Categories tab. Categories organise pages in the staff sidebar. The tab lists each category on one line, with its subcategories under it and how many pages each holds. A tag shows any setting that isn’t the usual one: Restricted, In menu, how many editors it has, or Template.
- Add a category with Add category.
- To change the order, drag a category by its handle (the dots at the start of its line) to where you want it. The new order is saved when you let go. A category takes its subcategories with it, and a subcategory moves among the others in its category.
- Without a mouse, move to a category’s handle with Tab and press Space to pick it up. Move it with the up and down arrow keys, then press Space again to drop it, or Esc to put it back. The arrow buttons at the end of each line also move a category one place at a time.
- Select a category to open its settings. There you can rename it, change who can see it, show it in the menu, choose who can edit it, set its template for new pages, add a subcategory inside it, or delete it. Only an empty category can be deleted, so move its pages to other categories and delete its subcategories first. Pages from other categories shown in it don’t stop it being deleted: they stay in their own categories. You’re asked to confirm before it goes, and a deleted category can’t be brought back.
- In the staff sidebar, subcategories are folded away under their category until someone opens it (see Find what you need).
- Once there are more than ten categories, a search box helps you find one. Clear it to drag categories into order.
You can also work on a category from the handbook itself. Point at it in the sidebar and select ⋯, or right-click it, then choose:
- Add page to start a new page in it
- Rename to rename it
- Add subcategory to add one inside it. Only top-level categories have this: a subcategory can’t have subcategories of its own.
- Show in menu to list it in the menu, or Take out of menu (see Categories in the menu). If three are in the menu already, it says so: take one out first.
- Category settings to open its settings here, for example to change who can see it
- Delete, once it has no pages or subcategories of its own. You’re asked to confirm first, and a deleted category can’t be brought back.
The ⋯ also shows on the category you’re looking at, so on a tablet, select the category first. On a phone, choose the category from the Category list, then select ⋯ beside the list.
At the foot of the sidebar, Add category adds a top-level category there and then, and Manage categories opens Categories here, for everything else, such as changing their order.
A category with no pages in it, or in the categories inside it, is greyed in the sidebar, ready for its first page. Staff don’t see it until it has one, so nobody opens a category to find it empty. Its editors see it greyed too, so they can add to it.
Pages that aren’t in a category are under Uncategorised, at the end of the sidebar, so everyone can still find them. To put one in a category, open it, select Edit and choose its Category.
Each category has a visibility setting, under Who can see it in its settings:
| Setting | Who can see the category and its pages |
|---|---|
| Everyone | All members of your practice |
| Roles | The roles you tick: Admin, Standard, or both |
| Specific people | Only the people you choose |
| Roles or people | Anyone with a ticked role, plus the people you choose |
Choose Save visibility to apply it. Pages in a restricted category don’t appear in search results for people who can’t see the category, and a direct link to one won’t open for them. Practice admins can see every category.
In the handbook’s sidebar, a lock beside a category means not everyone at the practice can see it, because it’s restricted or it’s inside a restricted category. You see the lock on every restricted category, and its editors see it on theirs. Other staff never see it.
A category’s editors can always see it and the categories inside it, whatever their visibility, so a category for one team only needs that team’s editors naming once. They still need to be able to see the category above it.
Show a page in more than one category
A page lives in one category, but it can show in others too, so staff find it wherever they look. For example, a page about prescription requests that lives in Reception could show in Pharmacy as well.
- On the handbook’s main page, select ⋯ on the page’s card (or right-click the card) and choose Also show in…. Tick the categories to show it in, then Save.
- Or, in the page editor, choose + Add under Also show in, below Category.
Practice admins can show any page in any category. Category editors can show the pages they look after in the other categories they look after.
It’s still one page: an edit changes it everywhere it shows, and it has one review date and one history. Its own category still decides who can see and edit it:
- Showing a page in another category never lets anyone new read it. If its own category is restricted, only the people who can see that category find it in the others, and the dialog reminds you.
- The editors of a category it’s shown in can’t edit it, unless they could already. They can take it out of their category, to keep it tidy: on ⋯ on its card, choose Remove from and their category’s name.
Staff find the page in each category it shows in. There, its card says where it lives, such as From Nursing › Ordering, so nobody takes it for a copy. On the page itself, its category is followed by Also in and the others. Under All and in search results it appears once, and each category’s count includes the pages shown in it.
- Showing a page in more categories doesn’t count as updating it, so it isn’t listed in What’s changed. The audit trail records it.
- Moving a page into a category it’s also shown in makes that its own category.
- On the Pages tab of the settings, each page is listed under its own category, with Also in and the others it shows in.
Letting staff edit a page
To let a standard user keep one page up to date, such as the rota, open the page in the page editor (Edit on the page) and find Who can edit in its settings:
- Type the name or email of someone who should be able to edit this page, and choose them from the list. Do this for each person, or tick All standard users can edit. × beside a name takes them off.
- Choose Save changes.
Those people see an Edit button when they open the page, which opens the page editor, and can edit list rows in place. They still can’t open the handbook settings. Their changes appear in the audit trail like anyone else’s. To let someone look after every page in a category instead, see Letting a team look after a category.
Users & access shows who edits what: the Handbook column says how many pages and categories each person can edit, and their panel lists them. The Handbook editors filter shows everyone who can edit at least one page.
Letting a team look after a category
To let a team keep a whole category up to date, such as your nurses with a Nursing category, name them as its editors. On the Categories tab, select the category and open Who can edit:
- Tick the people who should look after it. Only standard users are listed, as practice admins can already edit everything.
- Choose Save editors.
The editors of a category look after its subcategories too, so there’s no need to name them again on each one. They can:
- add pages and lists to the category and its subcategories, with Add page on the handbook’s main page, or from ⋯ beside the category in the sidebar
- edit any page or list there, including its attachments, list columns and rows, and smart visual
- move a page between the categories they look after
- show a page they look after in the other categories they look after, and take pages from other categories out of theirs
- see the category and every subcategory in it, whatever their visibility
They can’t open the handbook settings, change categories or who can see them, edit pages in other categories (unless they’re named on those pages), or delete pages. Only practice admins can delete a page. Editors’ changes appear in the audit trail under their own name.
Users & access shows who looks after what: the Handbook column says, for example, Can edit 1 category, and each person’s panel lists their categories.
Viewing as a standard user, and categories inside restricted ones
Being a category editor is given to a person by name, so it doesn’t count while someone uses View as Standard User: they see and edit what any standard user can.
The editors of a subcategory need to be able to see the category above it. If they can’t, they can’t see or edit the subcategory either, and Users & access doesn’t list it for them.
Templates for new pages
A category’s template is what new pages in it begin with, such as the headings every page should cover: supplier, delivery days, how to order and who covers. Whoever adds the page fills it in or changes it. The page keeps its own copy, so changing the template later doesn’t change pages already made from it.
On the Categories tab, select the category and open Template for new pages:
- For a category at the top level, choose Use a template, write the template, then choose Save template. Choose No template to stop using one.
- A subcategory uses the template of the category above it (Same as Nursing, for example) unless you choose Its own template or No template.
The template goes into Page content when someone starts a new page in the category with Add page. Choosing another category before writing anything swaps in that category’s template instead. Templates are text only, without images.
Keeping pages up to date
A handbook staff can trust is one that’s kept current. The toolkit reminds you when pages are due a check, lets staff tell you when something’s wrong, and lists what needs looking at in one place.
Review reminders
Each page has a Review reminder in the page editor: Every 3 months, Every 6 months, Every year (the default), Every 2 years or No reminders. A page is due a review that long after its Last reviewed date, or after it was added if it has never been reviewed. Choose Today beside Last reviewed once you’ve checked it. A new page has no Last reviewed date to set, as its reminder counts from the day it’s added: choose Change beside Review reminder to choose how often.
Staff see when a page was last reviewed under its title, such as “Reviewed September 2025”, and “Review due” once a review is due, so they know to take extra care. Pages that have never been reviewed say nothing until they’re due.
Changing only the review details doesn’t count as updating the page: it isn’t listed in What’s changed.
Needs attention
Needs attention, at the top of the Pages tab of the handbook settings, shows the pages to look at and how many there are for each reason:
- Problems reported: someone has reported a problem with a page that hasn’t been dealt with yet (see Problems reported by staff).
- Reviews due: a page’s review reminder has come round.
- Empty: a page has no text, pictures, rows or attachments yet.
- Not opened in 90 days: nobody has opened a page in 90 days, so it may be out of date or no longer needed.
It lists one reason’s pages at a time, starting with the most pressing. Choose another reason to see its pages. The first 10 are listed: choose Show all to see the rest.
For each page:
- Still correct records that you’ve checked it today, which clears a review that’s due and the 90-day check, without changing the page for staff.
- Mark report dealt with closes the problems reported with it, once you’ve put them right.
- Edit opens the page editor.
Problems reported by staff
Anyone who opens a page they can’t edit sees Report a problem at the top. They say what’s wrong or out of date, and their report goes to your practice’s toolkit administrators, with a link to the page. Reports appear:
- in Needs attention, against the page, until you mark them dealt with;
- in Signposting settingsSuggestions, marked Practice Handbook, with Open the page. See Suggestions.
The person who reported it can follow it under My suggestions.
Categories in the menu
To give a category its own place in the menu, select it on the Categories tab and tick Show in menu, or choose Show in menu from ⋯ beside it in the handbook’s sidebar. It’s listed in the menu under Practice Handbook, and opens the handbook at that category.
- Up to three categories can be in the menu. To add another, untick one first.
- Each person only sees the categories they can see in the handbook.
- They’re only listed while the Practice Handbook is switched on for your practice.
Choose a category’s menu icon
Each category in the menu has an icon beside its name, such as a phone for call handling or a pill for prescriptions. When you tick Show in menu, AI chooses one from the menu’s set of icons, by the names of the category, its subcategories and its pages. Until an icon is chosen, the category gets the one its name suggests.
To change it, open Menu icon under the category’s Show in menu and select another icon. Let AI choose asks AI again. The icon you choose is what everyone sees, and each change is recorded on the handbook’s Audit tab.
AI only chooses icons where your practice has handbook smart visuals switched on. Without them, choose the icon yourself or keep the one the name suggests. AI picks from the set and never draws an icon of its own.
Quick access buttons
Quick access buttons sit at the top of the handbook’s main page and open a chosen page in one click, for the things staff reach for every day, such as today’s rota or phone numbers.
On the Main page tab, under Quick access buttons:
- Under Add a button, search for the page under Page it opens and pick it.
- Optionally type a Label (optional); if you leave it blank, the button shows the page’s title.
- Choose the Background and Text colours, then choose Add.
Each button shows a preview of how it will look. Use the arrow buttons to reorder them. Delete takes a button off the main page once you’ve confirmed; the page it opens isn’t changed. Your colours are kept even when staff use the blue card style.
These are separate from the quick access buttons on the Signposting home page, which are covered in Highlights and buttons.
Pinned panel and on-take rota
The pinned panel sits at the bottom of the handbook’s main page and shows day-to-day operational information:
- GP taking on: this week’s on-take GP, taken from the rota
- Task buddy system: short steps for staff, including who covers who
- Post route: what to do after the call, such as trays, handover and routing rules
Edit the task buddy and post route text under Pinned panel on the Main page tab, check the preview, then choose Save pinned panel.
Set the on-take GP from the panel itself: choose Set on-take GP, or Edit rota once this week has one, fill in this week and the next three, then choose Save. Clearing a name takes that GP off the week. Only practice admins see these, and this week’s GP shows in the panel straight away.
For weeks further ahead, choose Open the full rota, which opens the On-take rota tab of the settings. Set one GP for each week (Monday to Sunday), moving between weeks with Prev, This week and Next; Upcoming weeks lists the next eight so you can see gaps.
Staff can collapse the panel, and it remembers their choice. It opens again when the on-take GP changes.
Smart visuals for handbook pages
A smart visual turns a handbook page into an infographic-style view: contact cards, numbered steps, checklists, buddy-group cards, role cards, key facts and warnings. It is built from normal page text, so it stays selectable, accessible and readable on any screen.
The Signposting Toolkit team switches on generating visuals for your practice. Once a visual is saved, everyone who can see the page can view it.
Generating a visual
- Open the page. Anyone who can edit it sees Generate smart visual.
- The AI picks from a fixed set of layouts and is instructed to use only facts on the page. It can’t invent its own designs, colours or images.
- The result appears as a preview, marked as not saved. You can move sections up or down, remove sections (a visual keeps at least one), type guidance such as “group by site” and choose Regenerate with guidance, or regenerate for a fresh arrangement.
- Choose Save visual to keep it, or Discard.
Guidance shapes the structure, not the styling: the app formats text such as phone numbers itself. When you regenerate an existing visual, the AI tries to keep the same structure where the content still supports it, so small edits don’t reshuffle everything. To take a visual down, use Remove visual.
What readers see
Readers can switch between Standard and Smart visual. The visual opens first while it’s up to date. Print visual prints just the visual with the page title, which is useful for a rota or buddy sheet at the desk.
When the page changes
The page text stays the source of truth: editing the page doesn’t change the visual. If the page is edited after the visual was made, the visual is hidden from everyone and readers see the standard view, until an editor regenerates it. Editors see a notice explaining this and, after saving an edit, a prompt with a Regenerate link. So an out-of-date visual isn’t shown alongside newer text. Saving and removing visuals appear in the audit trail.
For how AI is used and checked across the toolkit, see Using AI safely.
What’s changed
What’s changed on the handbook’s main page lists pages added or updated recently. It’s personal: its number counts the changes you haven’t seen yet, and those pages are marked New or Updated on their cards in the handbook.
A change counts as seen once you open the page, or choose Mark all as read on What’s changed. Changes you make yourself count as seen already. In the list, each page is tagged New or Updated with the date of the change, the ones you haven’t seen are marked Not seen yet, and you can filter by any of these.
A page that has changed since you last opened it says so at the top. Choose See what changed to see the edit: wording added is highlighted in green and wording taken out is struck through in red, with a line or two either side for context. For a list, it shows the rows added, changed and taken out. Opening an updated page from What’s changed shows the changes straight away.
It covers the last 14 days, or changes since a start date if the Signposting Toolkit team has set one for your practice. Only changes to what staff read count: a new title, badge, category, text, attachment or list row, not a review date or who can edit the page. Any member of your practice can open it, which helps staff keep up without checking every page.
Engagement
The Engagement tab shows Most viewed pages and Most active users for the last 7, 30 or 90 days, or all time.
Use it to check that new or important pages are being found. If a page staff should rely on is rarely opened, add a quick access button for it or move it to a clearer category. For figures across all modules, see Analytics and engagement.
Audit
The Audit tab lists changes to the handbook: who changed what, and when. Filter by period and by type: Pages, Categories, Quick Access, Rota or Operational panel.
Because handbook changes go live without an approval step, the audit trail is your main record for governance review and for tracing an unexpected change. It includes changes made by staff with editing rights, including category editors, and pages marked as reviewed, deleted or put back with Undo. Changes to who can edit a category, its template for new pages and its place in the menu are listed under Categories.
The audit trail keeps the full content of every version of a page that’s saved. Keep passwords out of the handbook: if a page looks like it has a password in it, the toolkit asks before saving it.
Related: Workflows for step-by-step processes, and Setup checklist and Surgery Health, where adding handbook pages is a recommended step.