For reception teams
Handbook, appointments and workflows
The other tools in the menu: your practice's handbook, its appointment types and its step-by-step workflows.
- Reception teams
As well as the symptom cards, the menu (☰) has tools for how your own practice works. Your practice chooses which of them to use, so you may not see all three.
| Use | When you need to |
|---|---|
| Practice Handbook | Check how your practice does something: rotas, contacts, procedures and local policies |
| Appointments Directory | Confirm which team runs an appointment type, how long it is and how to book it |
| Workflow Guidance | Follow step-by-step flowcharts for tasks such as processing a letter or a test result |
Practice Handbook
The Practice Handbook is your practice’s own guide to how it runs: who is on call today, what to do with a discharge letter, how repeat prescriptions are handled. The symptom cards tell you where to direct patients; the handbook covers everything about how the practice itself works.
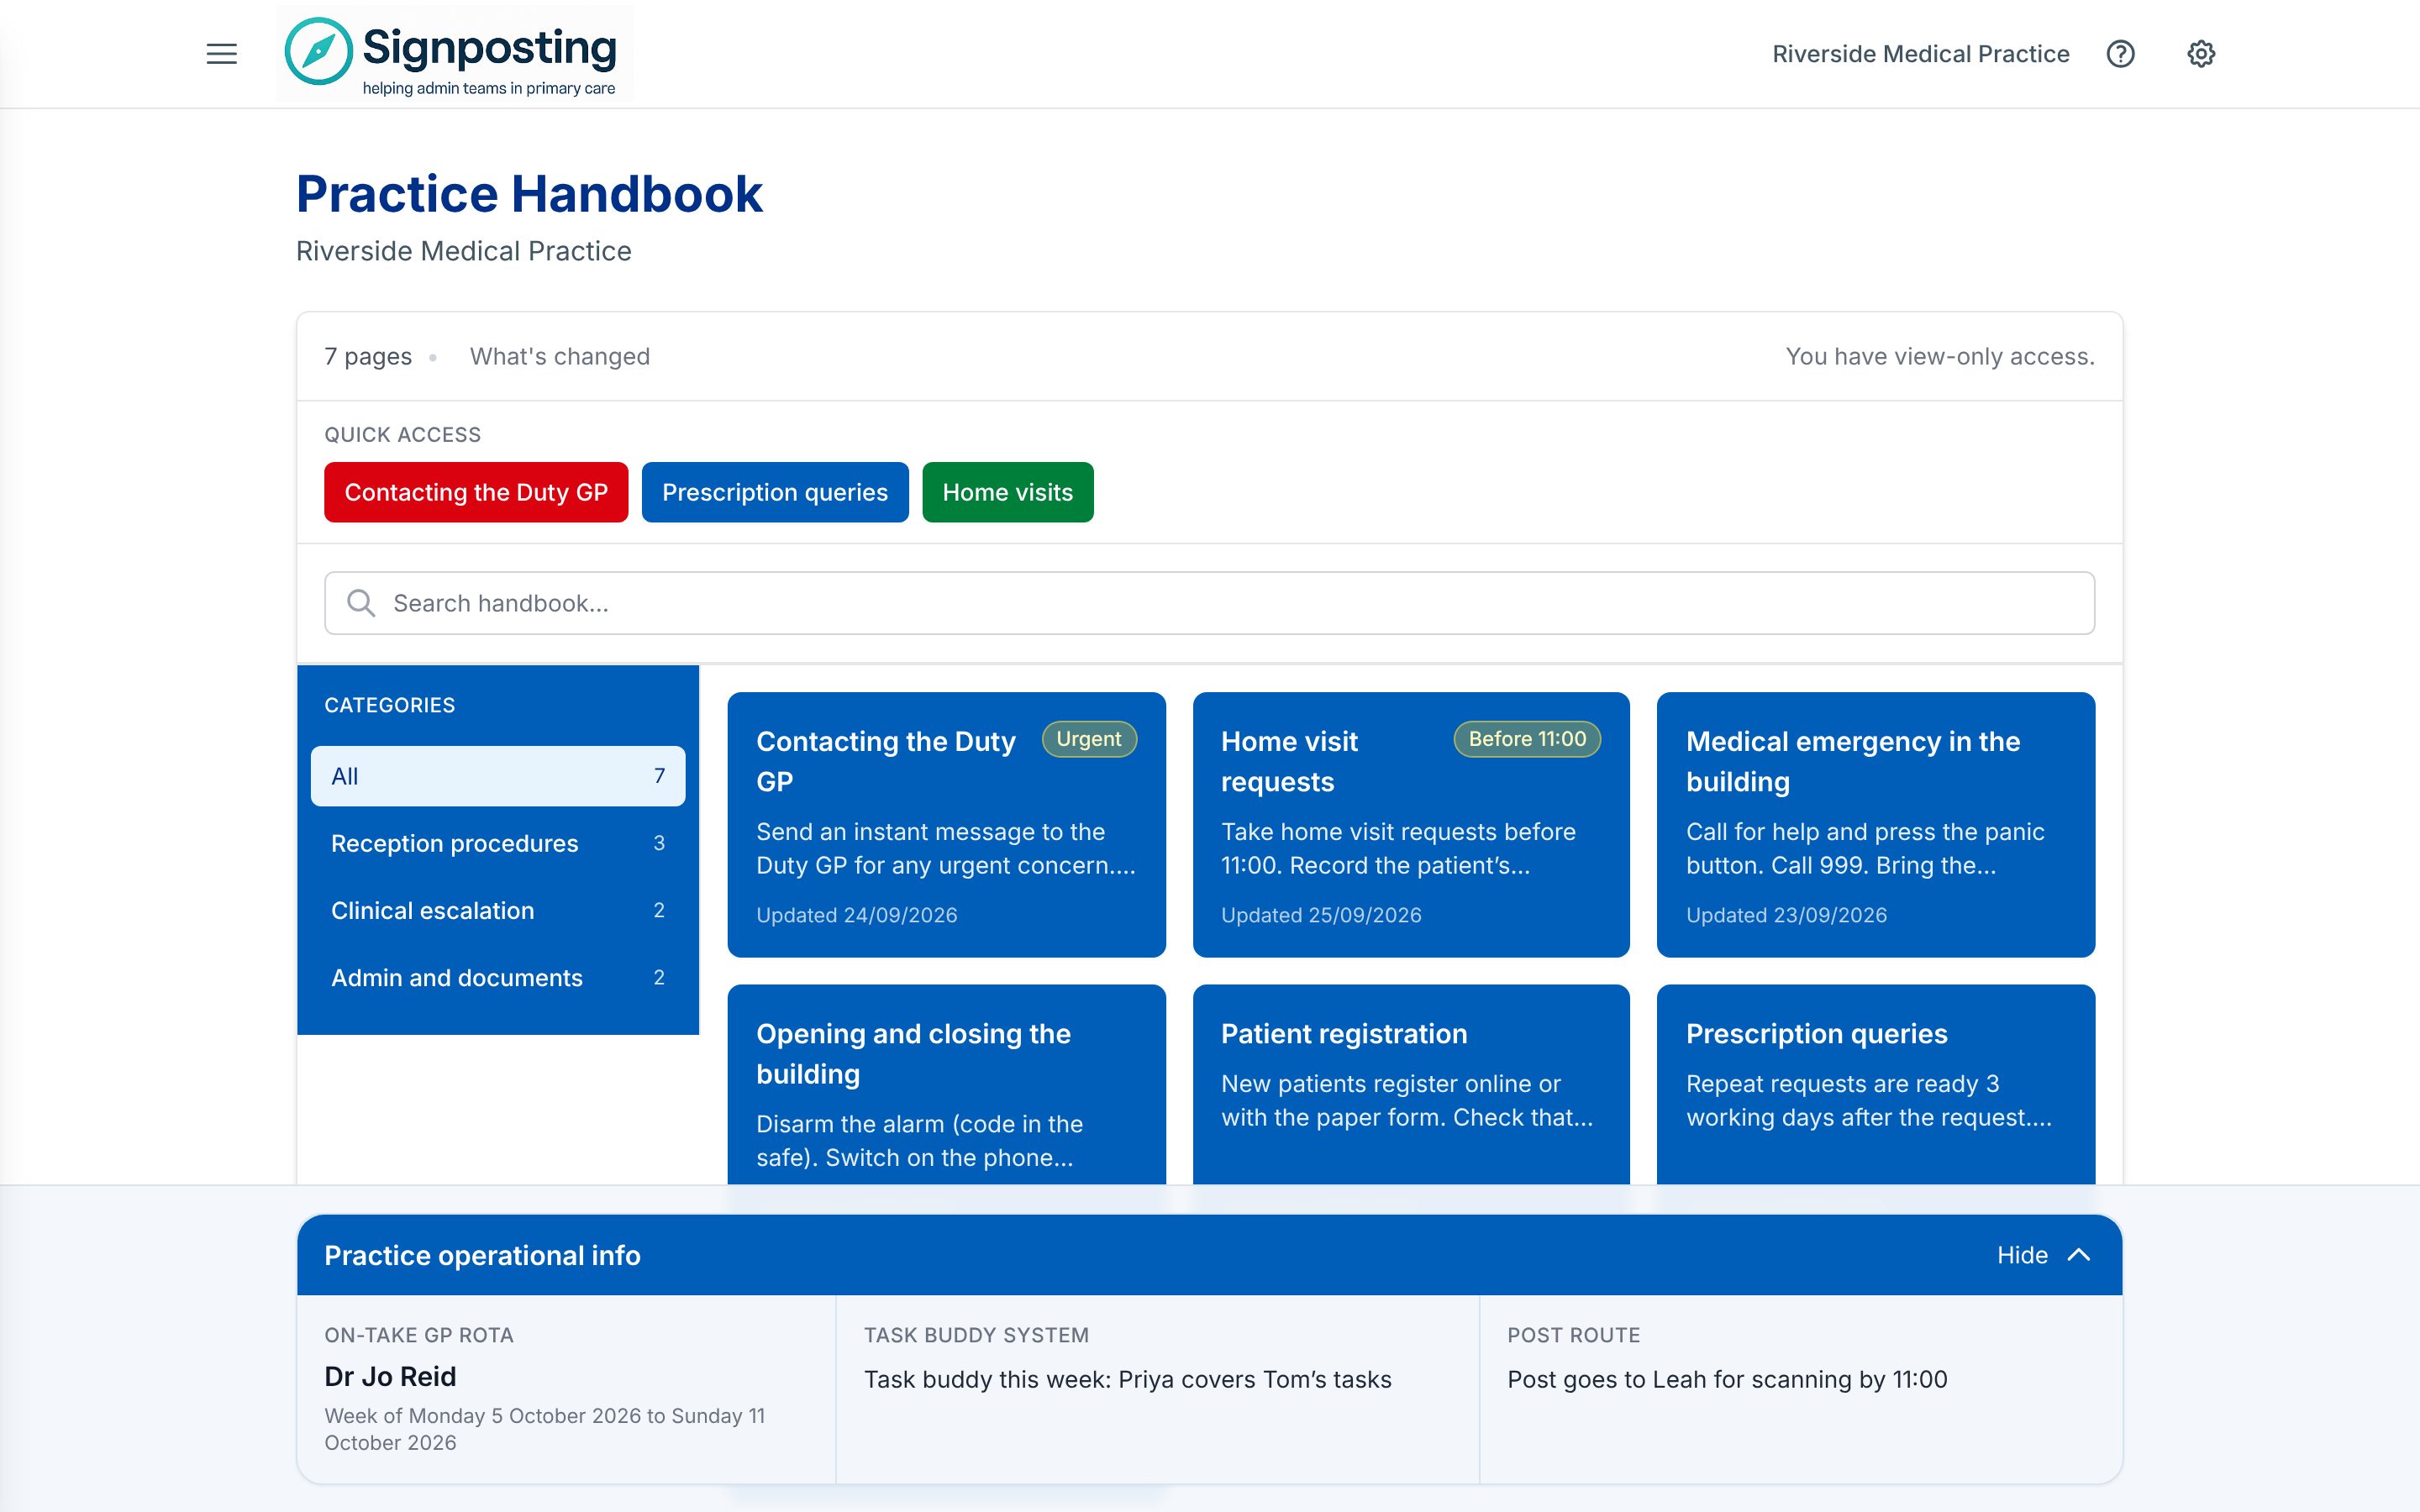
Open it with ☰ MenuPractice Handbook.
Find what you need
- Search: type in Search handbook…. Search looks through everything in the handbook you can see: page titles and text, role cards, the rows of lists such as phone numbers, and attachment names. It finds pages with all the words you type, in any order. Pages with your words in the title come first, and the others show the line where your words appear, highlighted. If the pages found are in more than one category, each card says which one its page is in. When you go back from a page, your search is still there.
- Press / to jump to the search box from anywhere on the page. Anything already in it is selected, so you can type a new search straight over it.
- Page cards: each card shows how its page starts, and a list’s card shows how many entries it has. A card marked New or Updated is a page that’s been added or changed since you last looked at it.
- A page can show in more than one category, so you find it wherever you look. In a category it’s shown in from another one, its card says where it lives, such as From Nursing › Ordering. It’s the same page, not a copy.
- Categories: select a category in the sidebar to show its pages. A category with no pages in it yet doesn’t show, and your practice may keep some categories for certain staff only.
- A category with others inside it has an arrow beside it. Select the arrow to show or hide them, or choose the category to open it. The handbook remembers which you’ve opened on this device.
- Pages that aren’t in a category are under Uncategorised, at the end of the list.
- A very long category name stops after two lines, ending in ”…”. Point at it to see the whole name.
- A dot beside a category’s page count means a page in it, or in a category inside it, has been added or changed since you last looked. On a phone, the Category list says how many, such as “2 changed”.
- While you search, each category shows how many pages match, and categories with no matches are greyed out. Searching with a category chosen shows the matches in that category, and Search all categories shows the rest.
- On a phone, choose a category from the Category list above the pages.
- Quick access: buttons at the top open the pages staff use most, such as today’s rota or phone numbers.
- Menu: your practice can list up to three handbook categories in the menu, under Practice Handbook. Select one to open the handbook at that category.
- Practice operational info: a panel at the bottom of the page shows information such as the On-take GP rota, the Task buddy system and the Post route. Select Show or Hide to open or close it. It starts closed, opens by itself when the on-take GP changes, and otherwise remembers your choice.
- What’s changed: select What’s changed to see handbook pages that have been added or updated recently. Its number counts the changes you haven’t seen yet: opening a page counts as seeing it, and Mark all as read clears them all.
Reading a handbook page
Most handbook pages have a short introduction, then sections for different roles (for example, Receptionist or Nurse), then any extra notes. Some pages also have attachments: links to documents elsewhere, or PDFs that open in your browser.
- Above the title is the category the page is in, after any category it sits inside, such as Nursing › Ordering. Select a category to see the other pages in it, which helps when you’ve opened the page from a link or a quick access button. If the page shows in other categories too, they follow under Also in.
- Select an image to view it full-screen, zoom in and drag it around. Press Esc or select the background to go back.
- Some pages are tables, such as a duty rota or a list of phone numbers. If your practice has given you permission, you can update the rows yourself from the page.
- Under the title, you can see when the page was last reviewed, such as “Reviewed September 2025”. Review due means it’s due a check, so take extra care with anything that may have changed, such as phone numbers.
- If the page has changed since you last opened it, a note at the top says so. Select See what changed to see the changes: wording added is highlighted in green, and wording taken out is struck through in red.
If a page has a smart visual, it opens on it. Select Standard for the normal page, and Print visual to print just the visual, for example to pin a rota up at the desk. Handbook visuals are checked and saved by whoever edits the page. If the page is edited afterwards, the visual is hidden until it’s made again, so you won’t see an out-of-date one.
If you can’t change anything, the handbook’s main page says You have view-only access. That’s normal for most staff.
If something’s wrong on a page
If a page is wrong or out of date, select Report a problem at the top of it, say what’s wrong, then select Send report. It goes to your practice’s toolkit administrators with a link to the page, and you can follow it under My suggestions. See Sending feedback.
If you look after a category
Your practice admin can make you an editor of a category, such as Nursing, so your team can keep its pages up to date. You can then:
- add a Guidance page or a Table (such as phone numbers) with Add page at the top of the handbook. Select the category first to add it there. Or point at the category in the sidebar, select ⋯ beside it (or right-click it) and choose Add page. The categories you look after show in the sidebar even before they have any pages, greyed until they do. A lock beside one means not everyone at the practice can see it. A new page may start with headings your practice has set for that category: fill them in, or replace them. If it starts empty, you can choose a layout to start from, such as Step-by-step procedure.
- edit any page or list in the category and the categories inside it, with Edit on the page, or from ⋯ in the corner of its card (or right-click the card). On a list’s edit screen you can also set up its columns.
- move a page between the categories you look after: choose Move to… from ⋯ on its card, or use Category on its edit screen.
- show a page in other categories you look after, so staff find it there too: choose Also show in… from ⋯ on its card, or Also show in on its edit screen. It stays in its own category, which still decides who can see it. A page from another category shown in yours can be taken out of it: choose Remove from and your category’s name from ⋯ on its card.
- check a page before you save it with Preview in the bar along the bottom of the edit screen, which shows it as staff will see it. Save with the button beside it, or press Ctrl and S (⌘ and S on a Mac). If you try to leave with changes you haven’t saved, you’re asked first.
- keep it current: set Last reviewed when you’ve checked it, and choose how often it should be checked with Review reminder. When a page’s card says Review due, you can choose Still correct from ⋯ on the card once you’ve checked it.
Only practice admins can delete a page or change the handbook’s settings, so ask one if a page needs taking down.
Every saved version of a handbook page is kept, so keep passwords out of it. If a page looks like it has a password in it, you’re asked to check before it’s saved.
Appointments Directory
The Appointments Directory lists your practice’s appointment types: which team runs each one, how long it is and any booking rules. Symptom cards name the appointment to book, and the directory uses the same names, so you can look one up when you’re not sure.
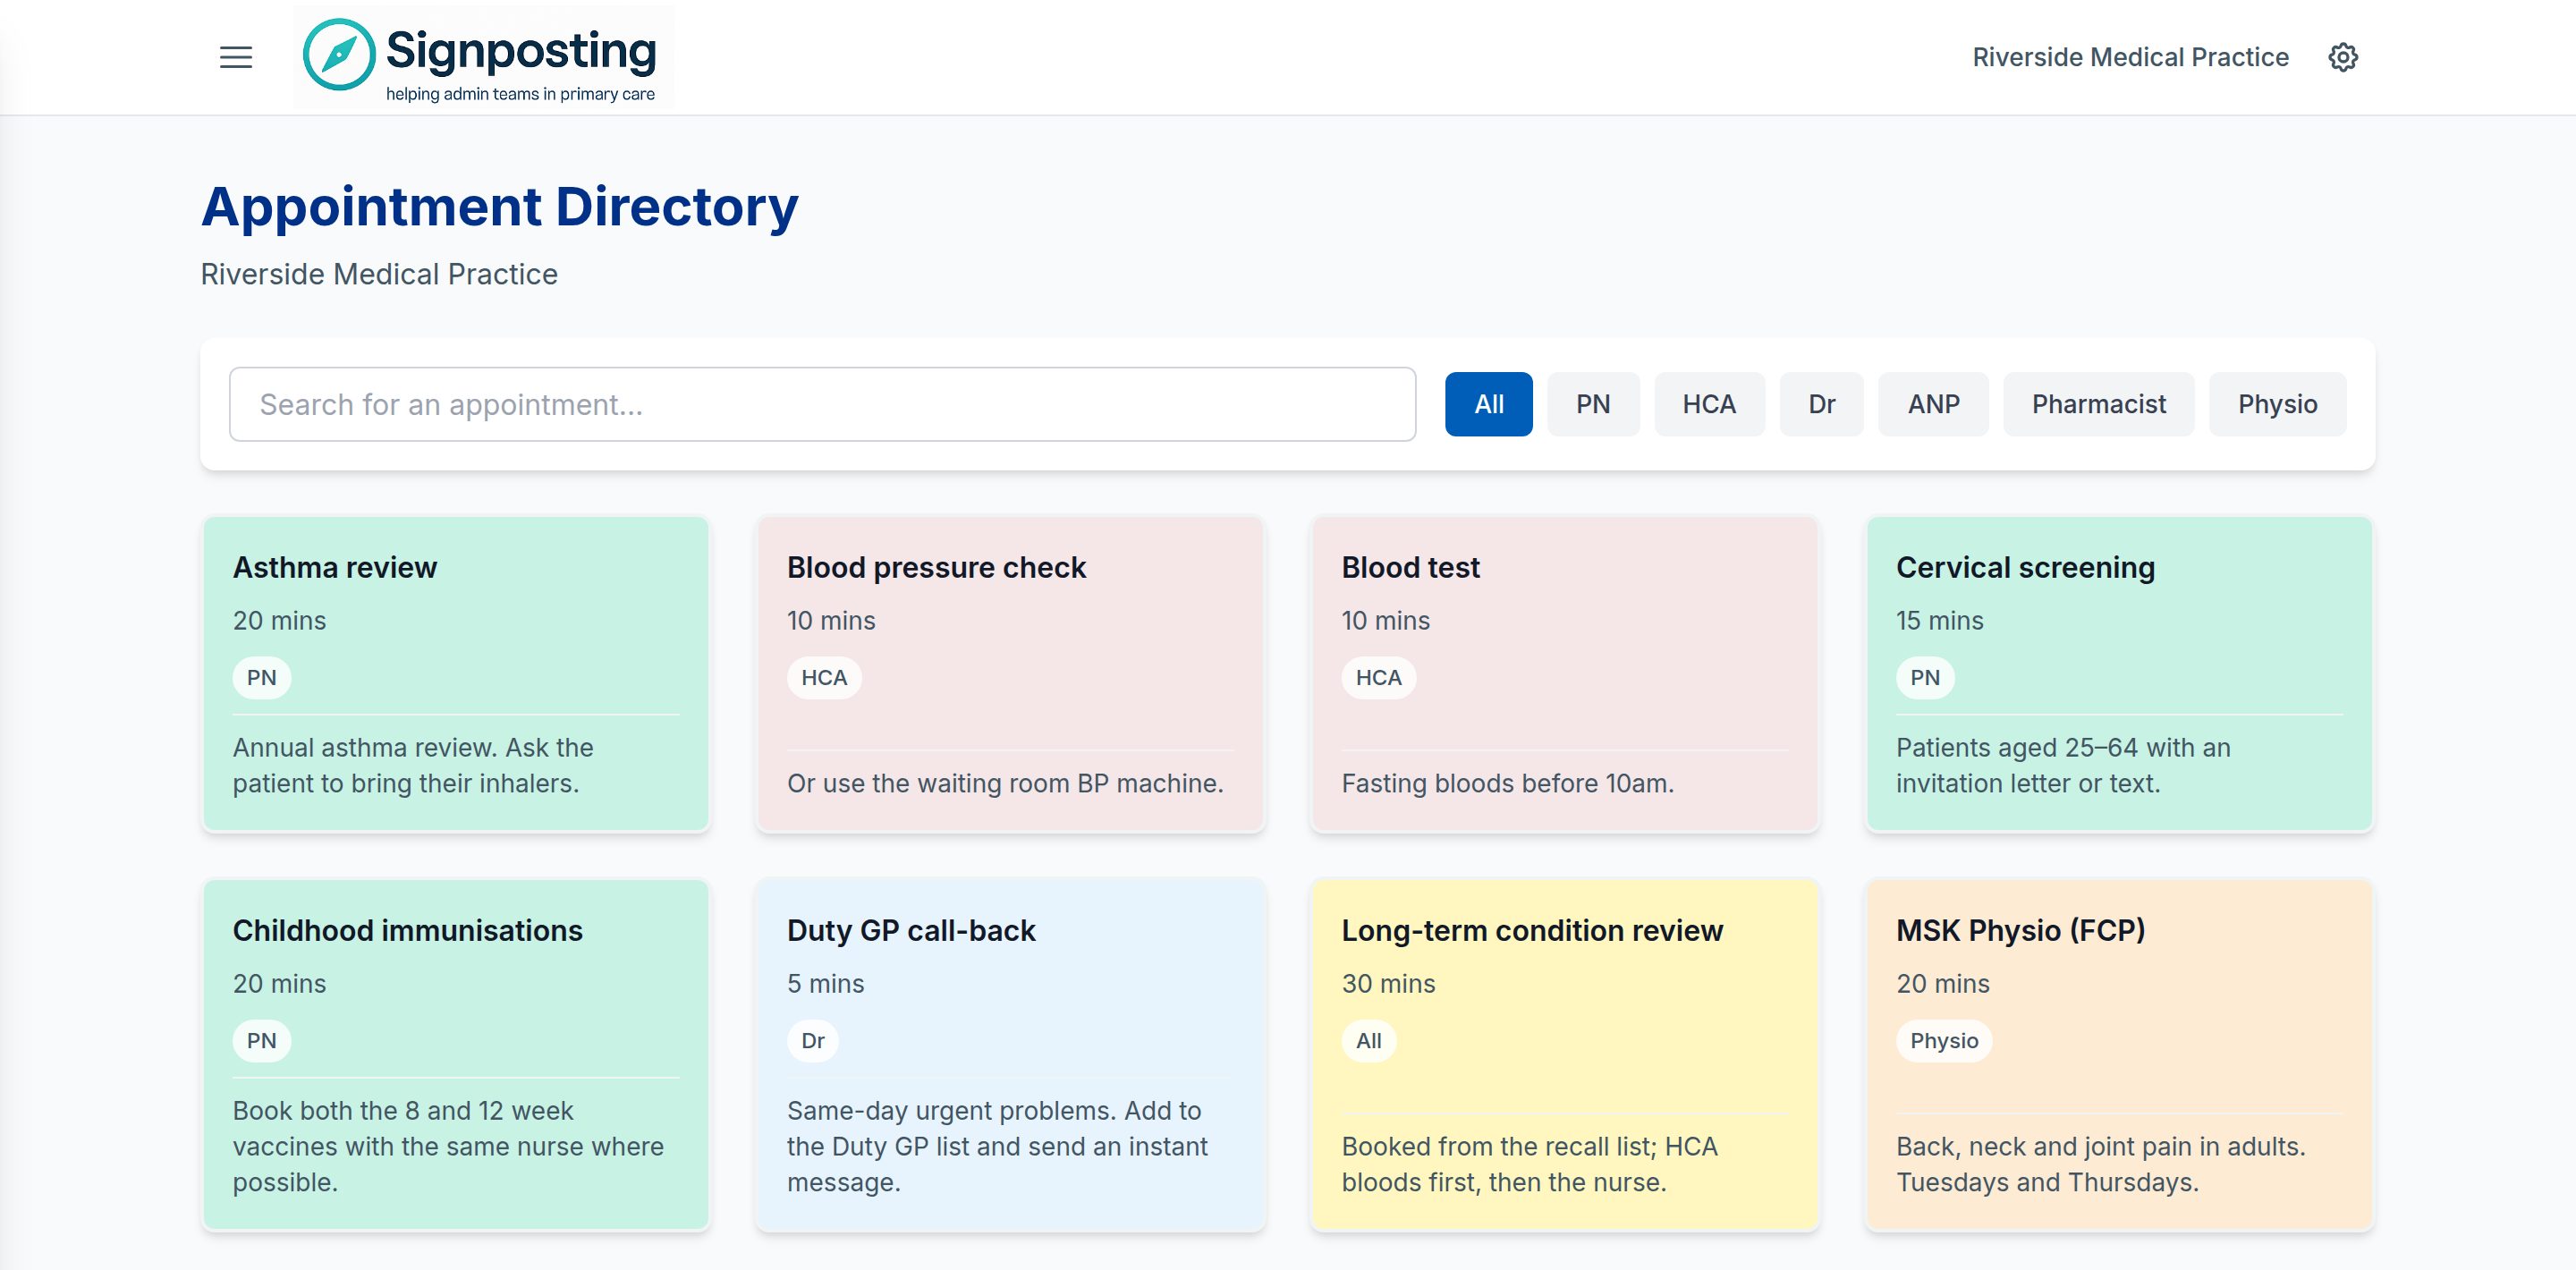
Open it with ☰ MenuAppointments Directory.
- Type in Search for an appointment… to search names and notes.
- Select a team button, such as All or a team your practice has added, to show only that team’s appointments. You can use search and a team together.
- Read the card for the appointment’s team, length and notes. Colours follow the team, unless your practice has chosen a different colour for an appointment.
If nothing shows, select Clear Filters.
Notes can include images, such as a room map. Select an image to view it full-screen. You can also reach an image with Tab and press Enter to open it. Zoom with + and −, a pinch or a double-click, press 0 to reset, and press Esc to close.
The directory is also a good way to learn your practice’s appointment types when you’re new or covering.
Workflow Guidance
Workflow Guidance gives you step-by-step flowcharts for tasks that need decisions along the way, such as handling a discharge summary, a clinic letter or a new patient registration.
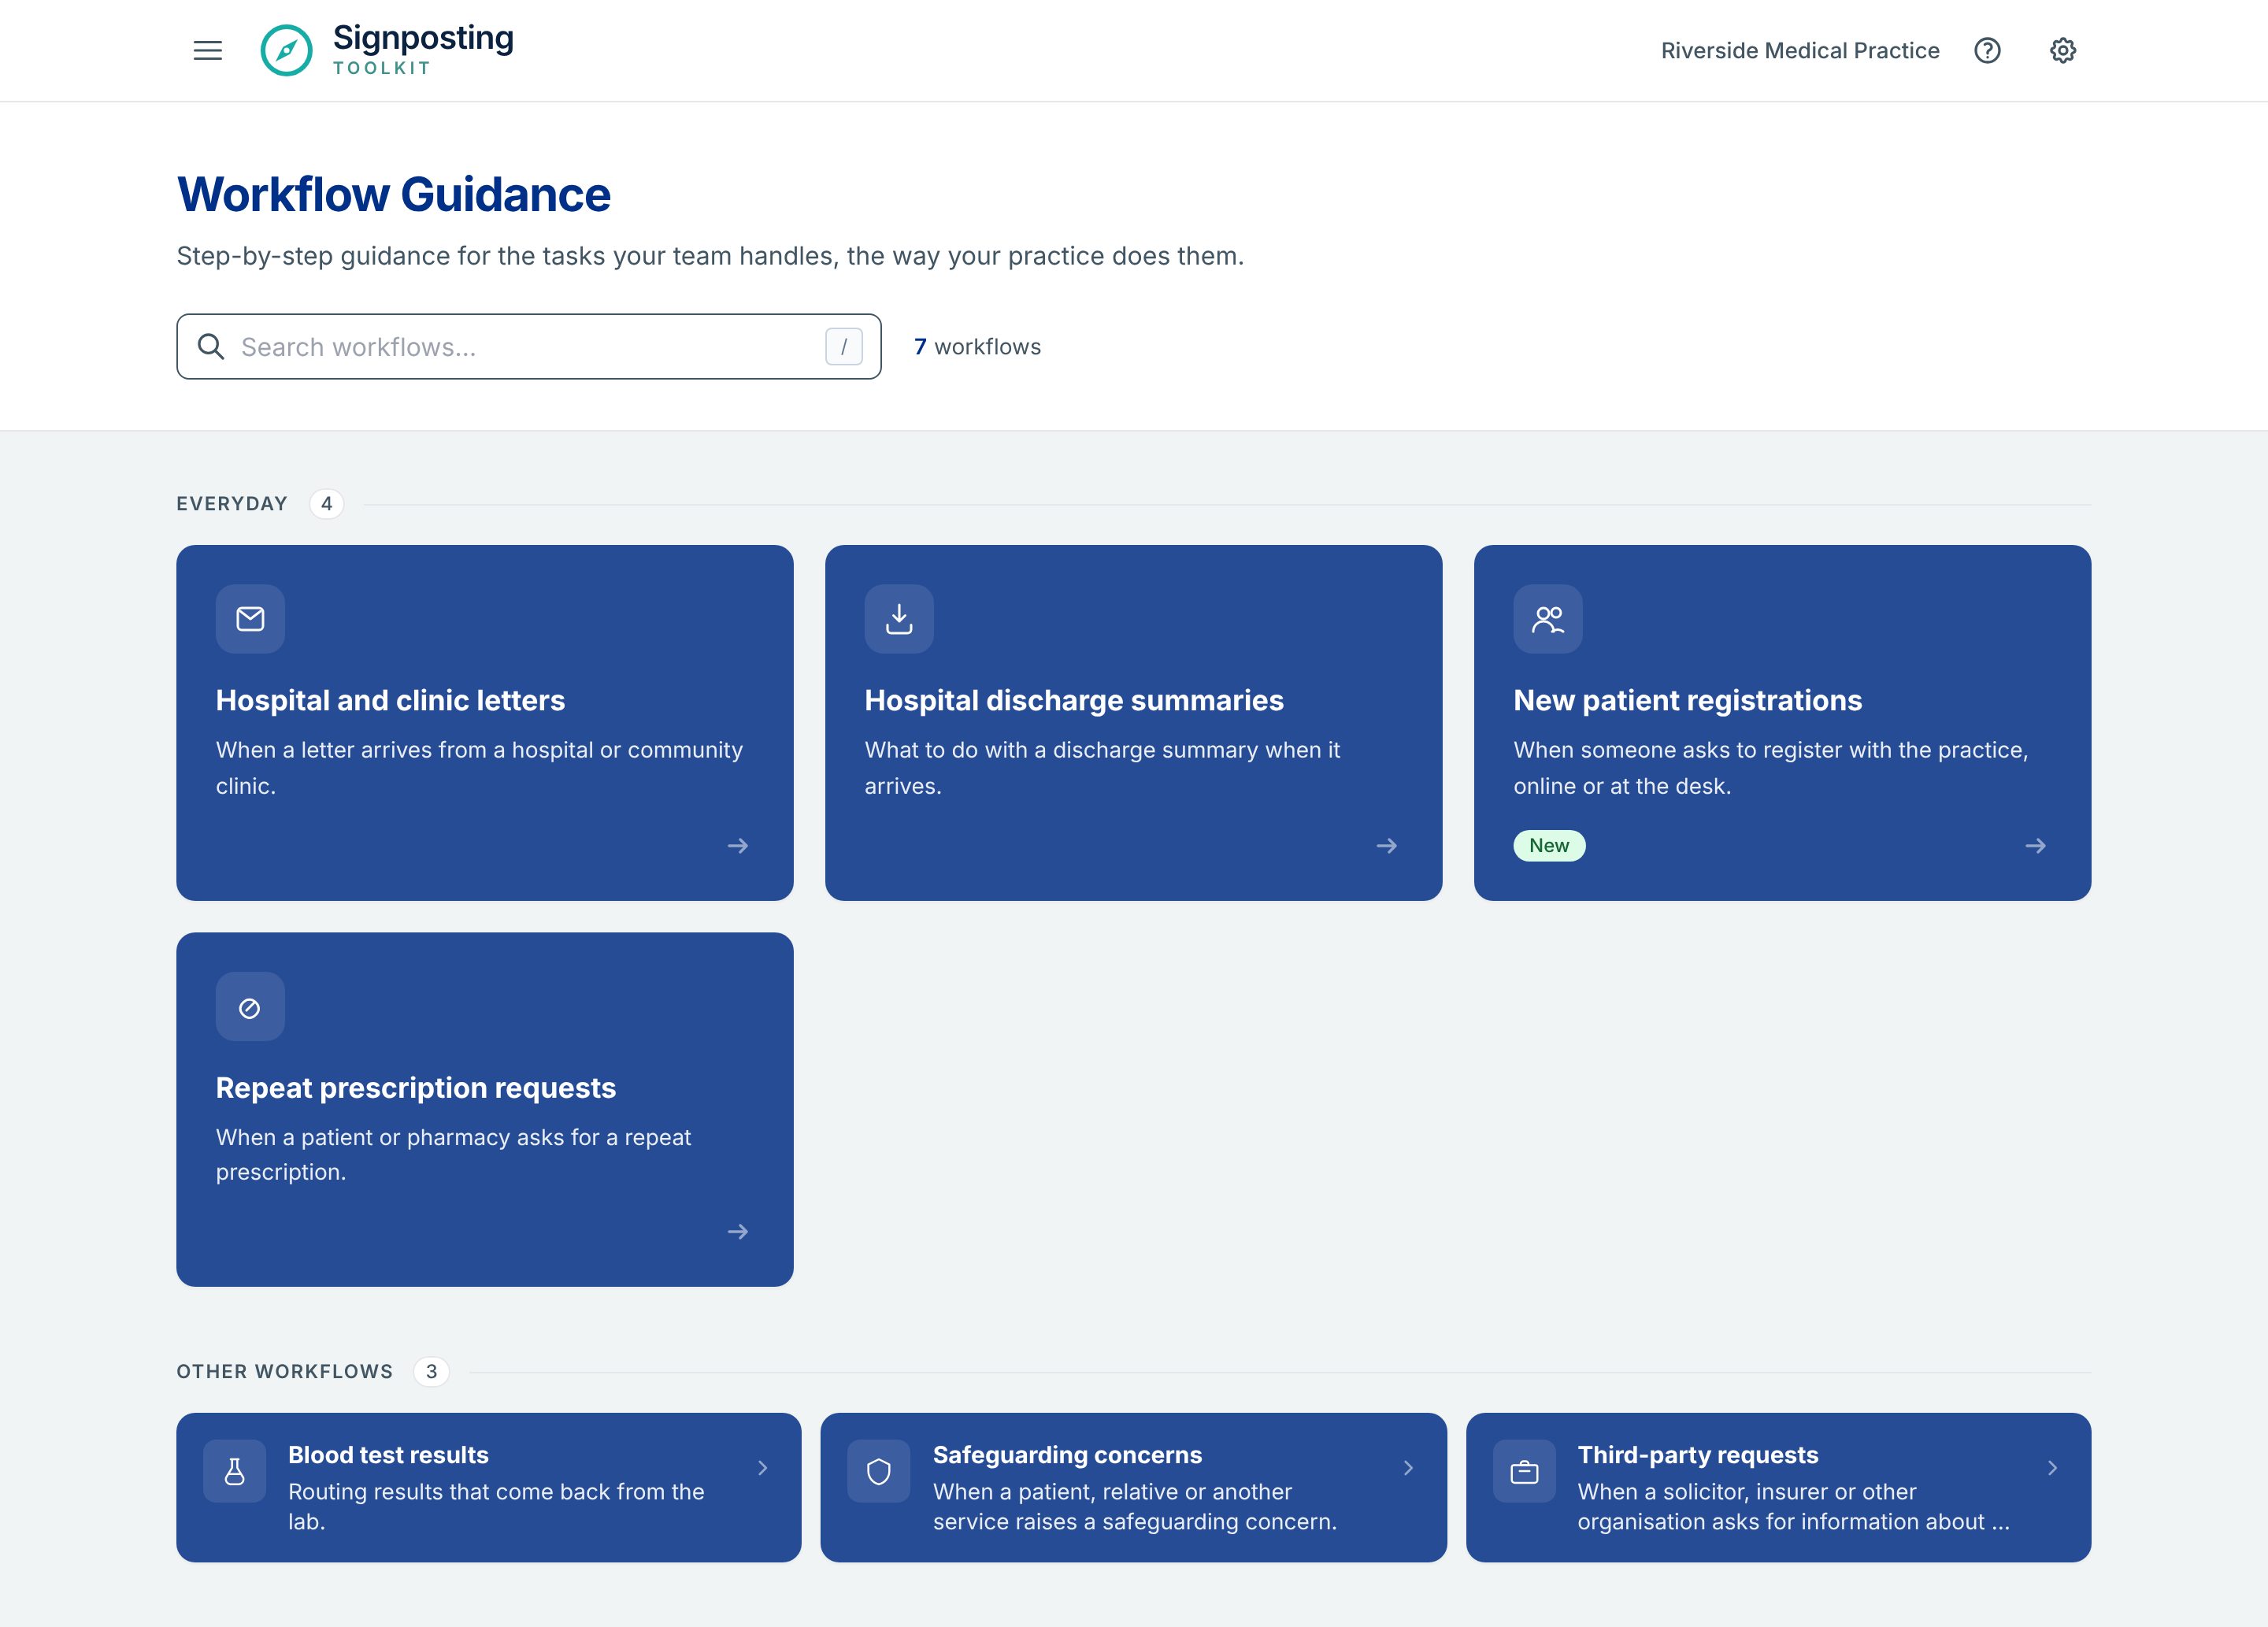
Open it with ☰ MenuWorkflow Guidance.
-
Find your workflow. The ones your team uses most are under Everyday, and the rest under Other workflows, each A to Z. Each card says when to use it.
- To search, type in Search workflows…, or press / to jump there from anywhere on the page. Search finds workflows with all the words you type, in any order, in their name or what their card says, and highlights them. When you go back from a workflow, your search is still there.
- A card marked New is a workflow added in the last two weeks, and one marked Updated has had its steps changed in that time, so check it carefully the first time. Customised for your practice means your practice has adapted one of the shared workflows to the way it works.
-
Select the workflow’s card to open it. The flowchart opens straight away, at a readable size at the top. Scroll to move around it. To zoom, pinch, or hold Ctrl (⌘ on a Mac) and scroll.
-
Follow the flowchart from the start:
- white cards are steps to read, check or act on
- cards with a question mark are questions: follow the line labelled with your answer
- green cards with a tick are outcomes, telling you what to do with the document
- a red or amber bar down the side of a step means it’s urgent or needs extra care
Point at a step to highlight the lines into and out of it.
-
Select a step, or its i button, to open the details panel and read the full guidance for it. Some steps link to another workflow from there. Select Clear details when you’re done.
Select Diagram legend in the details panel for a reminder of what each shape means. If the panel is closed, select Details at the top right of the flowchart to open it.
You only see workflows your practice has published for staff.
Find and open a workflow with the keyboard
| Key | What it does |
|---|---|
| / | Jumps to the search box from anywhere on the page |
| Enter in the search box | Opens the workflow if only one matches; otherwise moves to the first card |
| ↓ in the search box | Moves to the first card |
| Arrow keys on a card | Move between the cards as they sit on screen |
| Enter on a card | Opens that workflow |
| ↑ on the top row of cards | Goes back to the search box |
| Esc in the search box | Clears the search. Press it again to leave the search box |
Follow it step by step
If you’d rather not read the whole flowchart, select Step by step at the top of the workflow. It shows one step at a time.
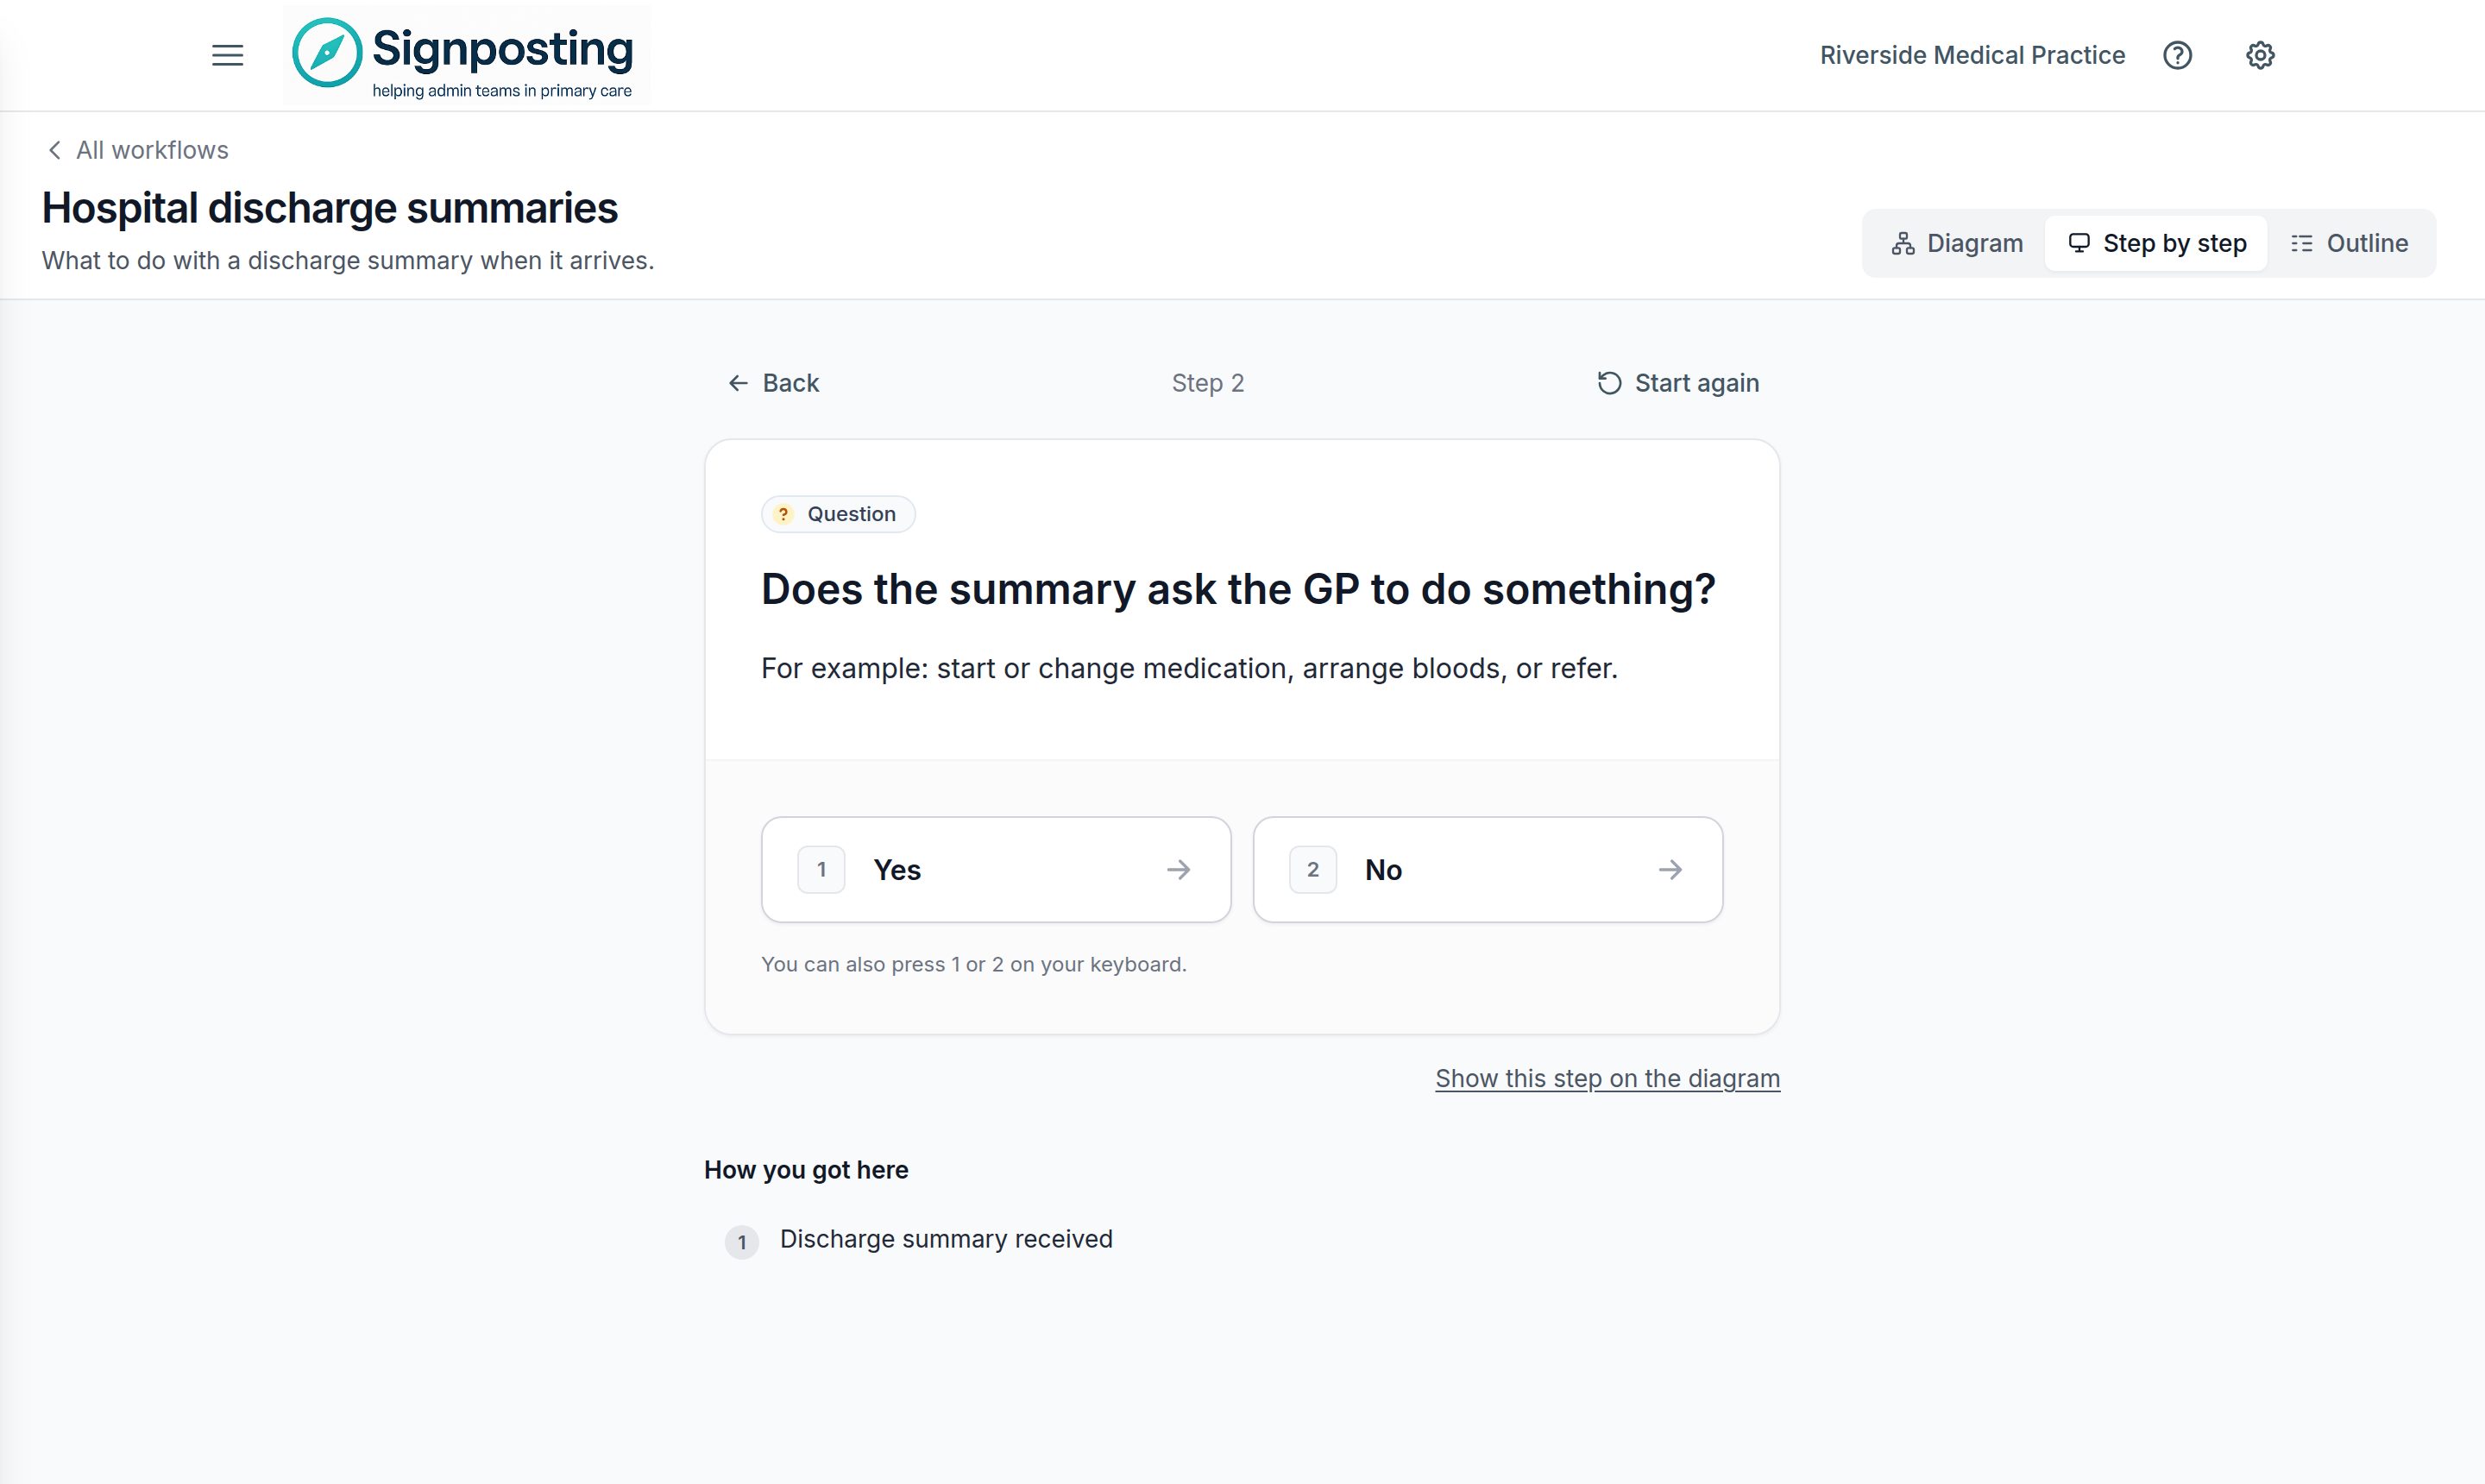
- Read the step. A question has a large button for each answer: select yours, or press its number on your keyboard. Other steps have Next step.
- Keep going until you reach an outcome. It says What to do with the document.
- How you got here, under the step, lists your answers so far. Select one to go back and answer it again, or use Back and Start again.
Show this step on the diagram switches back to the flowchart with that step’s details open. Nothing you choose is saved: Step by step is just another way of reading the workflow. Reference lists, such as diagnosis codes, are under Reference at the bottom.
Outline lists the steps in the order you follow them, with each question’s answers indented under it. Select a step to read its details. It can be easier to use than the flowchart on a small screen or with a screen reader.
A workflow opens in the view you used last on this computer: Diagram, Step by step or Outline.
Related: Finding a symptom · When you’re unsure