Running your toolkit
Workflows
Build, customise and publish the step-by-step workflows your team uses to process documents.
- Practice admins
Workflow Guidance gives staff flowcharts for processing documents and other admin tasks, such as a discharge summary or a clinic letter. Where the Practice Handbook holds reference information, a workflow handles decisions: if this, then that.
The Signposting Toolkit team switches Workflow Guidance on for your practice. Before that, practice admins can still open it and prepare workflows; a banner explains that staff won’t see them until it’s switched on. Staff who open it, or a link to one of its workflows, are told it isn’t switched on yet.
What staff see
Staff open Workflow Guidance from the menu. The page lists your workflows as cards, with a search box and two sections: Everyday first, then Other workflows (see Workflow types and landing sections). Each card shows the workflow’s icon, its name and its description, which says when to use it. Selecting anywhere on a card opens the flowchart.
Staff see published workflows only. A workflow first published in the last two weeks is marked New, and one whose steps have changed in that time Updated, so staff know to check it. Customised for your practice marks your practice’s own copy of a shared workflow. For more on the staff view, see Handbook, appointments and workflows.
What counts as a change
Only changes staff would notice mark a workflow Updated, such as a step added, removed, reworded or moved into a different panel, or a different answer, outcome, tone or linked workflow. What staff see now is compared with what they saw two weeks ago, so a change you undo within the two weeks doesn’t count.
These don’t mark a workflow:
- moving steps around the diagram (unless a step moves into a different panel), or changing its layout
- correcting capitals, spacing or punctuation
- changing its settings, such as its name, description or section
- publishing your practice’s copy of a shared workflow before you’ve changed its steps
The cards follow each person’s Theme in Preferences: white, or the classic blue Signposting and the Practice Handbook use.
As an admin, you also see:
- workflows still in draft, marked Draft and Not visible to staff
- Unpublished changes on published workflows with changes staff don’t see yet
- a ⋯ on each card with what you can do with that workflow (you can also right-click the card), the same as Manage workflows offers: Edit, Settings and Delete… for your practice’s own workflows and customised copies, Customise… for shared workflows you haven’t customised yet, and Duplicate…, Copy link and Open in new tab for any of them
- Engagement and Manage workflows at the top right of the page
That card opens Manage workflows too.
The canvas
Each workflow opens as a canvas showing the flowchart: its steps, the lines between them and the answers on those lines. The canvas fills the window and opens at a readable size at the top of the flowchart. Staff follow it as they work through the document.
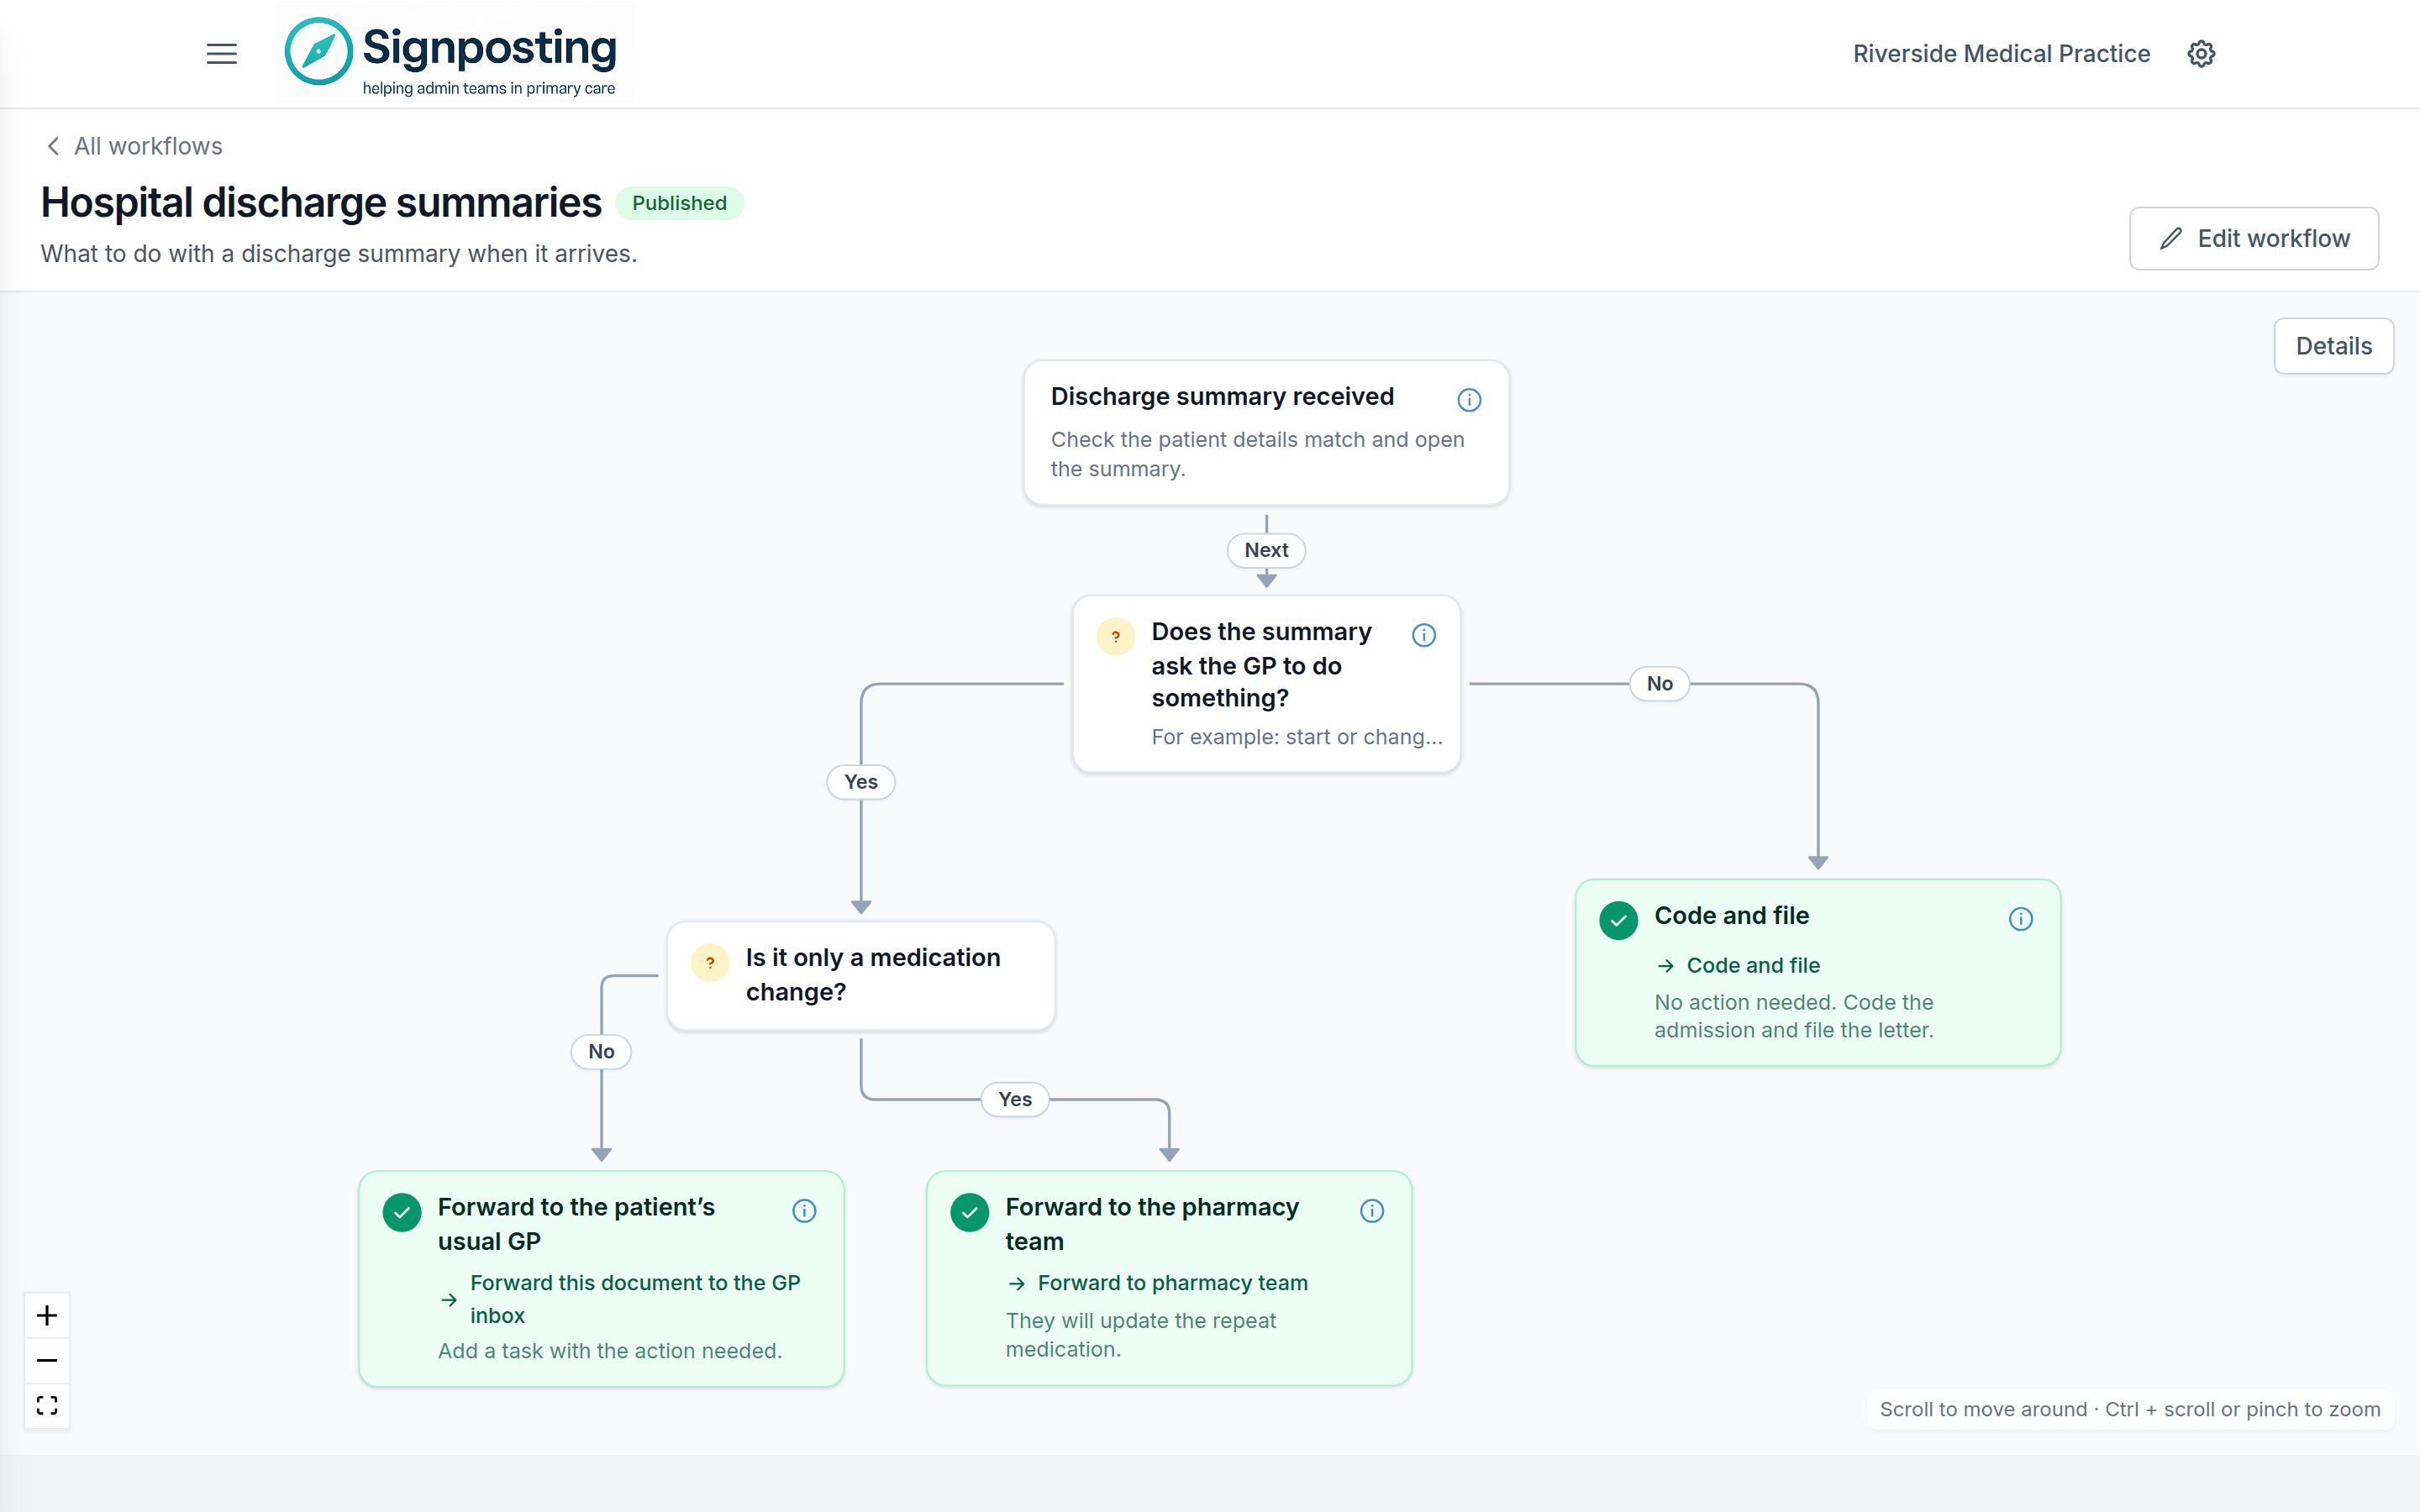
- Scroll to move around the flowchart. To zoom, pinch, or hold Ctrl (⌘ on a Mac) and scroll. The buttons in the bottom corner zoom too.
- Point at a step to highlight the lines into and out of it in blue, so you can follow a route.
- Click a step, or its “i” button, to see its full guidance in the Details panel. Clear details clears the panel.
- The Diagram legend in the Details panel explains what each kind of step looks like.
The Details panel starts closed when you’re viewing a workflow. Details, at the top right of the canvas, opens it.
Above the canvas are the workflow’s name and All workflows, which takes you back to the landing page. Admins also see the workflow’s status, Draft or Published, and Shared on a shared workflow.
Diagram, Step by step and Outline
The buttons at the top right of a workflow show it in three ways:
- Diagram: the flowchart on the canvas.
- Step by step: one step at a time, with a large button for each answer, until staff reach an outcome. How you got here lists the answers so far. Nothing is saved: it’s a way of reading the workflow. It’s also a quick way to try out your changes before you publish them.
- Outline: the steps as an indented list, in the order staff follow them, with each question’s answers under it. It can be easier to use than the diagram on a small screen or with a screen reader.
A workflow opens in the view each person used last on their computer. What staff see is described in Handbook, appointments and workflows.
Viewing and editing modes
A workflow opens in viewing mode, which is what staff see. To change it, choose Edit workflow at the top of the page. While you’re editing:
- a note under the workflow’s name says when staff will see your changes: a draft stays hidden until you publish it, and changes to a published workflow wait until you publish them (see Changing a published workflow)
- Saving… and then Saved next to the name show your changes being kept (see Saving and undoing changes)
- a toolbar at the top of the canvas undoes changes, adds steps and lays them out, and every path that isn’t finished ends in a + (see Build the flowchart)
- each step shows the dots you can drag between steps to connect them
- the side panel opens when you select a step or a line, and closes when you click an empty part of the canvas or press Esc
- you can switch between the Diagram and the Outline; Step by step comes back when you choose Done editing
Choose Done editing to go back to viewing mode. Reloading the page keeps you in editing mode, and a workflow with no steps yet opens ready to edit.
Edit workflow appears on workflows your practice created or customised. A shared workflow shows Customise for your practice instead: see Customising a shared workflow.
Node types
Workflows are built from five types of step.
| Step | How it looks | Use it for |
|---|---|---|
| Instruction | White card | Something staff need to read, check or do before continuing |
| Question | Card with a question mark | A decision, where the next step depends on the answer |
| Outcome | Green card with a tick | The end of a path, and what to do with the document |
| Panel | Background box with a heading | Grouping related steps visually |
| Reference | Side card with a list | Supporting information shown alongside the flow |
- Instruction steps can hold detailed guidance, such as checklists, diagnosis codes or steps, shown when staff click “i”. The first words show on the card under the title. For example: “Code diagnoses: check the discharge diagnosis matches one of the listed codes and code if appropriate.”
- Question steps branch into two or more paths. Each line from a question carries its answer, such as Yes and No.
- Outcome steps show a title and what to do with the document, for example “Forward this document to the GP inbox”. They can also hold guidance behind “i”.
- Panel steps separate phases of a long workflow, such as initial triage, clinical review and action. They don’t change the logic.
- Reference steps hold lists staff may need, such as referral criteria. Enter one item per line.
Step options
Select a step while editing to change it in the side panel. Changes apply as you type, and save by themselves.
- its Title and Details for staff (for a Reference step, its Items, one per line). You can also rename a step by double-clicking its title on the canvas
- for a Question, its Answers: rename an answer, choose where it Leads to, remove it, or choose Add answer
- for an Instruction, its Next step
- for an Outcome, What to do with the document, such as Forward to GP or Code and file
- Tone: Normal, Important or Urgent, for Instruction, Question and Outcome steps. Important and Urgent steps have an amber or red bar down the side, so staff take extra care
- under More options, the STAMP badge and Linked workflows: buttons staff can use to carry on in another workflow, each with its own Button text
Steps given their own colours before tones existed show as the nearest tone (reds as Urgent, ambers and yellows as Important) until you choose one.
Delete step removes the step and the lines into it. A question’s answer that led to it stays, with a + to add what comes next.
Workflow types and landing sections
Each workflow’s Where should it appear? setting decides where the landing page lists it:
- Everyday: shown first, on a larger card, for the workflows your team uses most
- Other workflows: shown further down, on a smaller card, for processes needed less often, such as safeguarding, and workflows used within or alongside others
Each section lists its workflows A to Z. If all your workflows are in the same section, the page doesn’t show its name.
In Manage workflows, each workflow shows:
- its section: Everyday or Other workflows
- its status: Published or Draft, plus Unpublished changes when a published workflow has changes staff don’t see yet, and Hidden when List on the Workflow Guidance page is turned off in its settings
- a source badge: Shared for a shared workflow, Customised for your practice’s version of one, or no badge for a workflow your practice created
Creating and editing workflows
Create a workflow
- In Manage workflows, choose Create workflow….
- Under How do you want to start?, choose:
- Blank: an empty workflow, built from the first step
- A starter: a ready-made outline of a common job, such as Hospital and clinic letters, Third-party requests or Test results, for you to change to match how your practice works
- A copy of a workflow: one of your workflows, or a shared one as your staff see it (see Duplicate a workflow)
- Draft it with AI, if your practice has it: see Draft a workflow with AI
- Enter a Name and, optionally, a Description. The description appears on the workflow’s card on the Workflow Guidance page, so say when to use it, such as “When a hospital or community clinic letter arrives.” A starter or a copy fills these in for you to change.
- Under Where should it appear?, choose Everyday or Other workflows.
- Choose Create and start building. The canvas opens ready to edit: with a prompt to add the first step, or with the steps it started from.
The new workflow starts as a draft, so staff can’t see it until you publish it. Starters make no clinical decisions: their questions are about the document, and their outcomes say who it goes to.
Duplicate a workflow
Choose Duplicate next to a workflow in Manage workflows, or Duplicate… on its card on the Workflow Guidance page. Create workflow… opens ready to copy it, named “Copy of” and the workflow’s name. The copy is a separate draft with its own steps: changing it doesn’t change the workflow you copied, and staff don’t see it until you publish it.
Your own workflows are copied with any changes you haven’t published yet. A shared workflow is copied as your staff see it. To adapt a shared workflow rather than start a new workflow from it, use Customise instead.
Draft a workflow with AI
If the Signposting Toolkit team has switched on AI workflow drafts for your practice, Create workflow… also offers Draft it with AI.
- Choose Draft it with AI.
- Under Describe the process, say what staff check, the decisions they make and where each kind of document goes. You can paste your existing written instructions, up to 12,000 characters. Don’t include any patient details.
- Enter a Name, choose where it should appear, then choose Draft the workflow.
After a few seconds the draft opens, ready to edit and laid out for you, with a reminder to check it. AI can get things wrong, so check every step, answer and outcome against how your practice works, and change what needs changing. Like any new workflow, it’s a draft: staff don’t see it until you publish it.
The AI works only from what you give it. It’s told not to invent local policy, contacts, time limits or clinical advice. Where your description doesn’t say what happens after an answer, the answer is left leading nowhere, so Things to check lists it. See AI tools and Using AI safely.
To change the draft afterwards, you can describe the change to AI: see Refine a workflow with AI.
Refine a workflow with AI
If your practice has AI workflow drafts, you can also ask AI to change a workflow you’re editing, such as one it drafted. Describe the change in your own words. AI changes only what you ask for, and keeps the rest of the workflow as it is.
- While editing, choose Refine with AI at the right of the toolbar.
- Under What would you like to change?, describe the change, for example “Put the DNA letters steps in their own labelled section. Don’t change the decisions.” You can start from one of the examples. Don’t include any patient details.
- Choose Propose changes. After a few seconds, AI’s version of the workflow appears in place of yours. Nothing has been saved yet.
- Check what changes. The side panel lists the changes and what AI says it did. On the diagram, new steps are marked New, changed steps Changed, and steps that are only in a different section Moved. The panel also lists anything that needs checking, such as an answer that no longer leads anywhere.
- Choose Apply changes to keep the changes, or Cancel to leave your workflow exactly as it was. Change the request takes you back to describe the change differently. Until you apply or cancel them, you can’t publish or discard changes.
Applied changes save like any other change, and staff don’t see them until you publish. Until you make another change, Undo AI change above the diagram puts the workflow back exactly as it was. After that, Undo in the toolbar takes changes back one at a time. Each request starts afresh: AI works from the workflow as it is now and what you’ve just asked for.
- AI keeps everything you don’t ask it to change: the wording of each step, every answer and where it leads, and which section each step is in.
- Steps with the same wording stay separate, such as a “File without forwarding” outcome in two different sections. If AI combines steps anyway, the side panel warns you.
- To group steps under a label, AI uses a panel, not a step that acts as a heading.
- An outcome ends a path. If staff carry on after one, ask AI to make it an instruction and say what comes next.
- “Make the layout more compact” puts the steps closer together without changing anything else about them. See Laying out the steps.
- On a workflow you’ve laid out by hand, steps stay where they are, and a new section is drawn round its steps. If a change can’t fit without moving steps, the side panel says so and the steps are laid out for you.
AI can get things wrong, so check its changes before you apply them, and the workflow before you publish it. See AI tools and Using AI safely.
Build the flowchart
A new workflow opens with a prompt to add the first step: an Instruction, a Question or an Outcome. From then on, every path that isn’t finished yet ends in a +.
- Choose the + under a step, or under one of a question’s answers, then what comes next: Instruction, Question or Outcome. The new step appears already connected, with its title selected so you can type its name.
- A new question starts with Yes and No answers, each with its own +. To rename an answer, click it on its line. To add another, use Add answer in the side panel.
- When two paths end in the same place, or a path goes back to an earlier step, choose the +, then Go to a step that’s already there and pick the step.
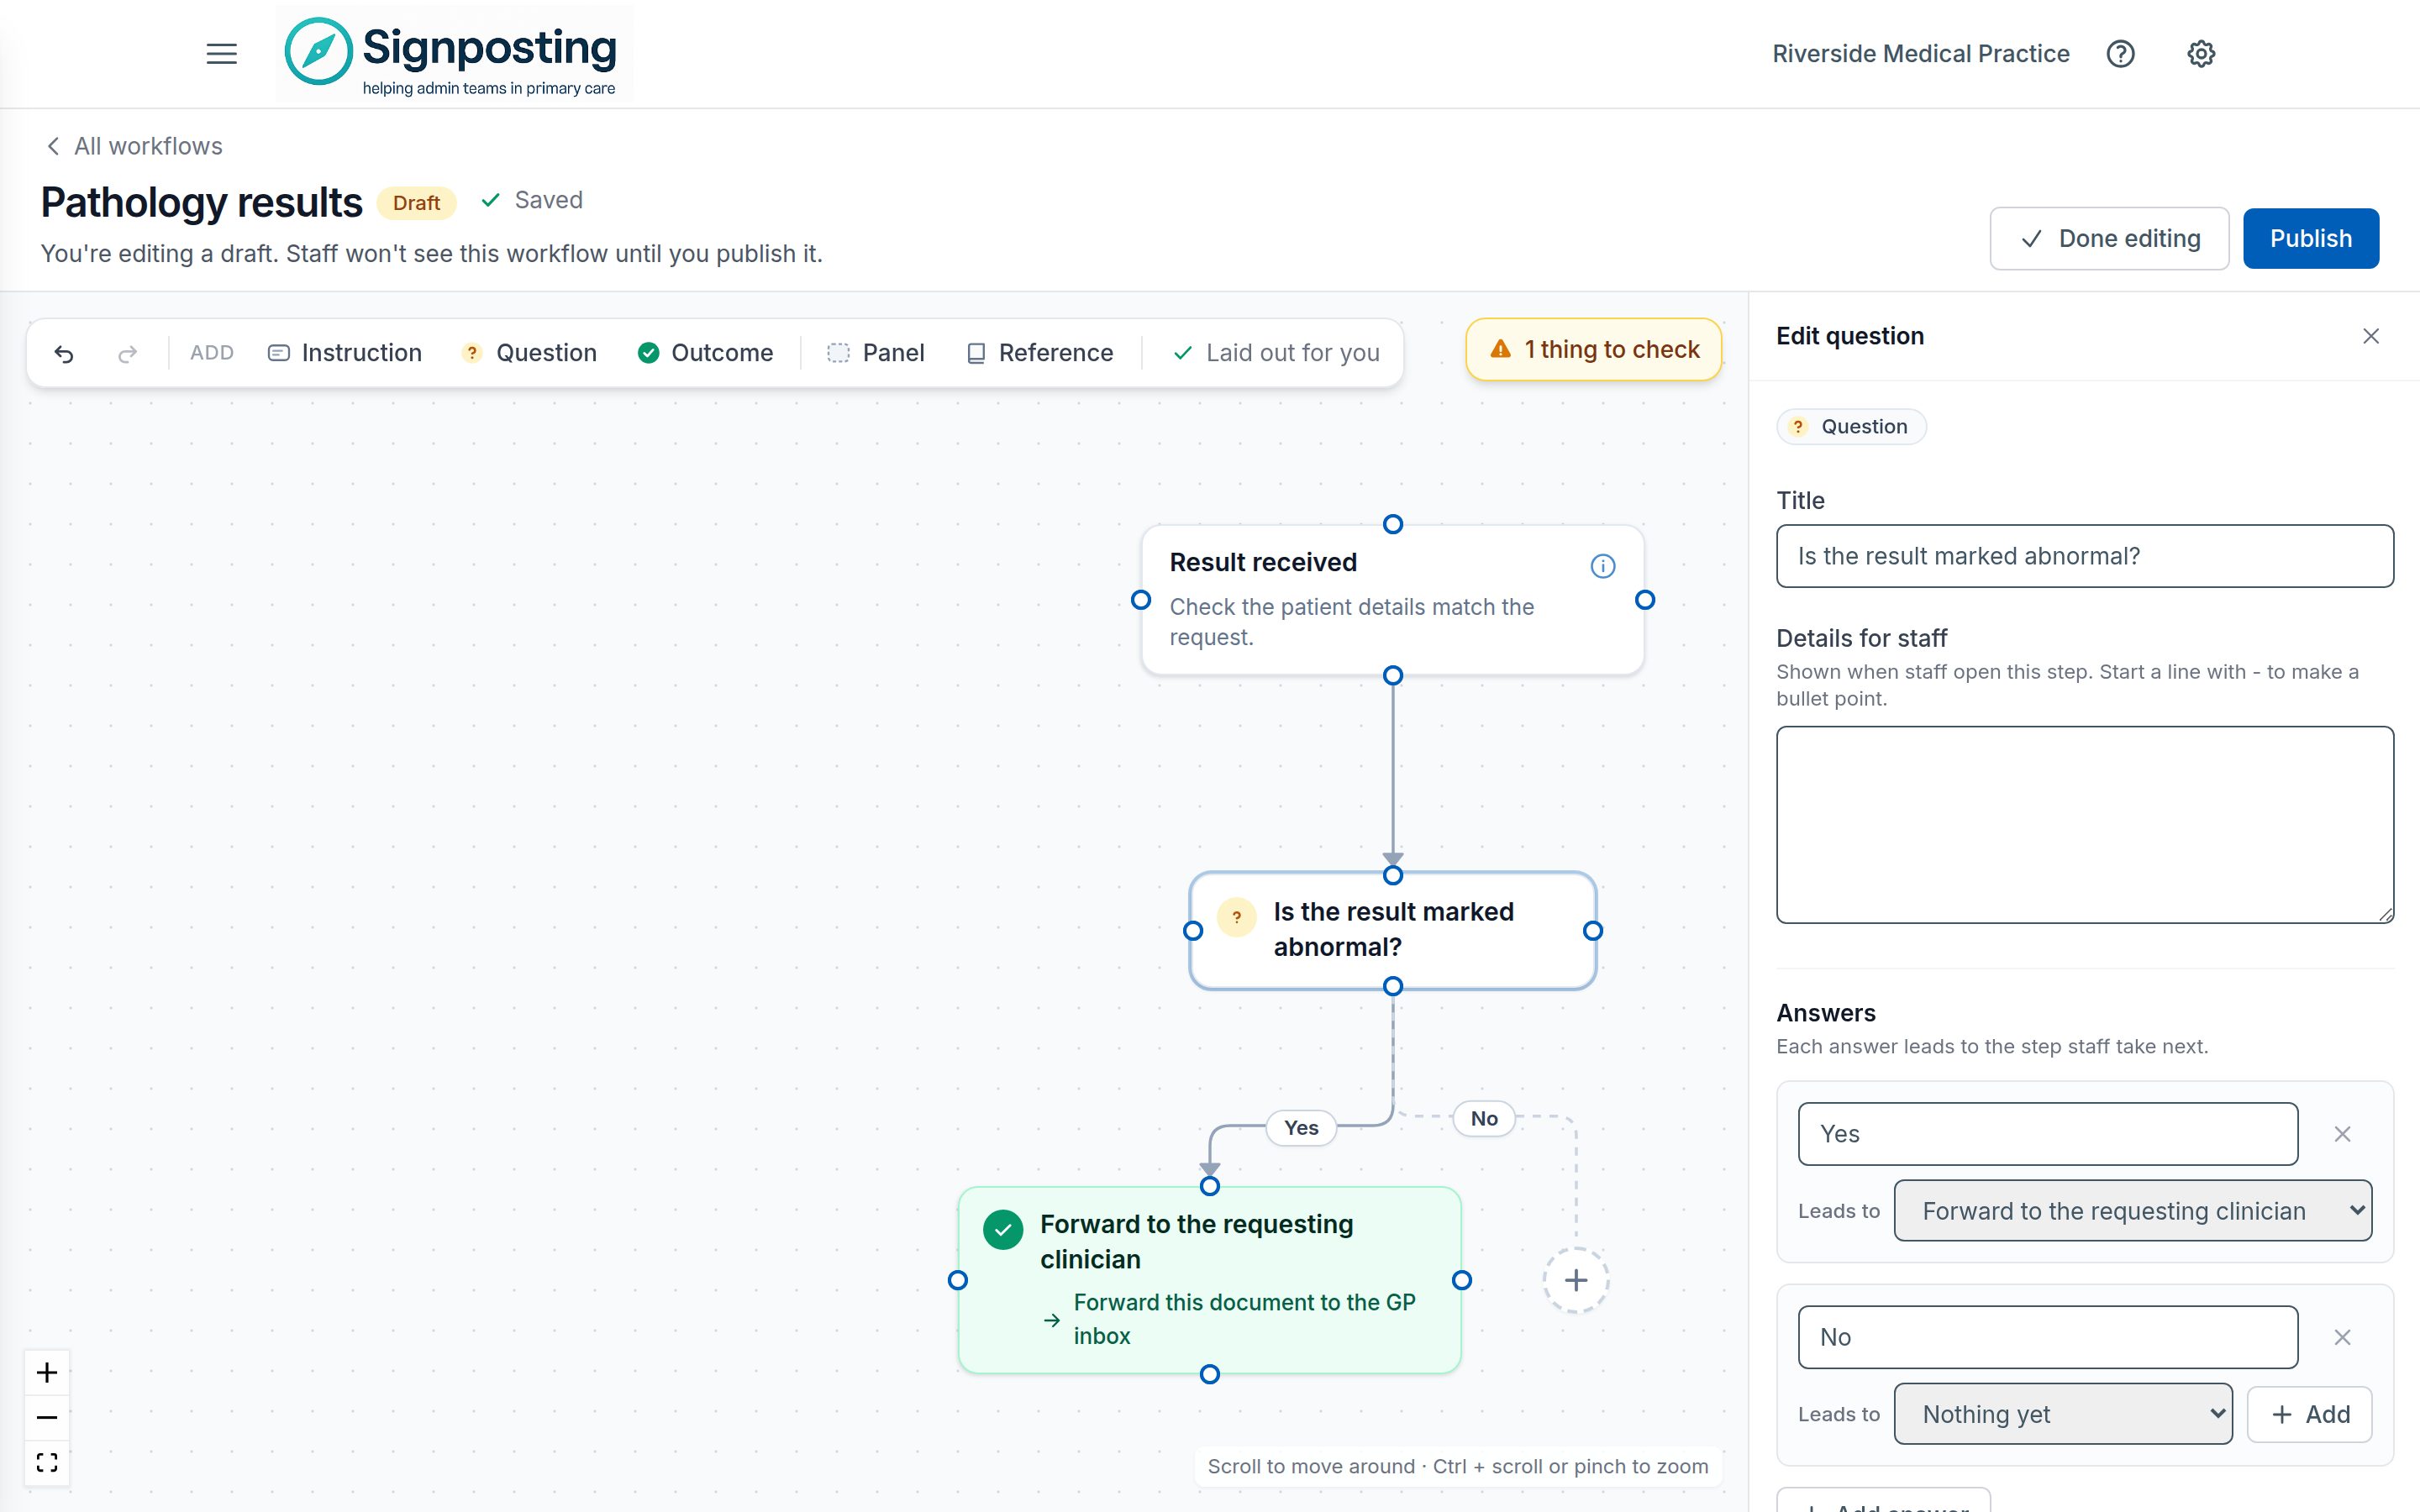
The toolbar’s Add buttons add a step that isn’t connected to anything yet, and a Panel or Reference card.
- You can also build from the Outline: select a step to change it in the side panel, and choose Add what comes next under an answer, or Add the next step under an instruction, to add a step where a path isn’t finished. The toolbar, the undo buttons and the checks are above the list.
- You can also connect two steps by dragging from a dot on the edge of one to a dot on the other. A line from a question asks for the answer’s name, with Yes and No one click away.
- Click a line to change its label or where it leads, or to remove it.
- To delete a step, select it and choose Delete step, or press Delete. Undo brings it back.
Staff don’t see any of this until you publish.
Laying out the steps
New workflows are laid out for you, top to bottom: each step below the one before it, and a question’s answers side by side, Yes before No. A step that only one answer leads to sits just below it, and a step several answers lead to sits below them all. Panels are drawn round the steps inside them. Steps the main path doesn’t lead to, such as a panel for a different kind of letter, go beside it, with any reference cards. The toolbar shows Laid out for you, and the layout follows as you add, rename and remove steps.
To place steps by hand instead, drag one where you want it. Steps then stay where you put them, and Tidy up in the toolbar lays them all out again. Workflows built before automatic layout keep their hand-drawn layout until you choose Tidy up. Like any other change, a new layout reaches staff when you publish it.
- Hold Shift while dragging to keep a step in line with where it started.
- To group steps in a panel, drag them inside it, then choose Tidy up. While steps are placed by hand, you can select a panel and drag its edges to resize it.
- If you’ve asked AI for a more compact layout, the toolbar shows Laid out compactly, and the steps stay closer together as you edit. To go back to the usual spacing, ask AI for it, or use Undo.
Things to check
While you edit, the top right of the canvas shows Every path is finished, or how many things are worth checking before staff use the workflow:
- an answer that doesn’t lead anywhere yet
- a step that nothing leads to, or that nothing comes after
- an outcome that doesn’t say what to do with the document
- a step or answer without a name
- a workflow with no outcome at all
Choose the count to see the list, then Show me to go to one. None of them stops you publishing: the publish dialogs list them, so you can fix them first or publish anyway.
Saving and undoing changes
There’s no Save button. Your changes save by themselves a moment after you make them, and Saved appears next to the workflow’s name. Staff still don’t see them until you publish.
- Undo and Redo are at the left of the toolbar. You can also press Ctrl + Z (⌘ + Z on a Mac) to undo, and add Shift to redo.
- If a change can’t be saved, for example because the connection dropped, Couldn’t save appears with Try again, and the editor keeps trying. Leaving or publishing waits for it.
- Undoing every change since the last publish clears Unpublished changes.
If the workflow is changed somewhere else while you’re editing
If someone else saves changes to the workflow while you have it open, or you change it in another tab, your copy isn’t saved over theirs, and publishing or discarding changes won’t publish or throw away changes you haven’t seen. The editor says the workflow has been changed somewhere else. Choose Reload to see it as it is now, then make your latest change again.
Change a workflow’s settings
Choose Settings next to a workflow in Manage workflows to change its name, description, icon (Change… or Use default) and where it appears, then choose Save settings. Settings apply straight away and don’t unpublish the workflow. Untick List on the Workflow Guidance page to hide a workflow from staff without deleting it.
In the table, View opens the canvas, Edit opens it ready to edit and Duplicate makes a copy. Open diagram on the settings page opens the canvas too.
Delete a workflow
Choose Delete next to a workflow in Manage workflows, or Delete… on its card on the Workflow Guidance page (choose ⋯ or right-click the card). You’re asked to type DELETE to confirm. It removes the workflow with all its steps and its usage history, and removes links to it from other workflows, so it can’t be undone. To stop staff seeing a workflow without deleting it, untick List on the Workflow Guidance page in its settings instead.
Deleting your practice’s customised copy of a shared workflow takes your practice back to the shared workflow. A shared workflow itself can’t be deleted from your practice, because the Signposting Toolkit team maintains it.
Customising a shared workflow
Shared workflows are maintained centrally, and appear at your practice once the Signposting Toolkit team has published them. They’re marked Shared in Manage workflows and at the top of the canvas. To adapt one for your practice, choose ⋯ on its card on the Workflow Guidance page, then Customise…. You can also choose Customise in Manage workflows, or Customise for your practice at the top of the canvas. Then confirm.
This creates your practice’s own copy of the version your staff see, which opens ready to edit. Changing it doesn’t affect the shared version.
Your copy starts as a draft. Staff keep seeing the shared workflow until you publish your copy, and from then on they see your copy instead.
Approving workflows for staff
Staff see published workflows only. New workflows and customised copies start as drafts.
You can publish a draft in either of two ways:
- Choose Publish at the top of the canvas, then Publish to confirm. If there are things to check, such as a path that stops part-way, the dialog lists them first; you can fix them, or choose Publish anyway.
- Choose Settings in Manage workflows, then Publish under Publishing.
Changing a published workflow
Once a workflow is published, changes to its steps go into a working copy. Staff keep seeing the published version, so you can make several changes, check them and publish them together.
While you have changes staff don’t see yet, the workflow shows Unpublished changes next to its status, and the top of the canvas offers:
- See what staff see: shows the published version, as staff see it. Back to your changes returns to the working copy.
- Publish changes: lists what has changed since the last version, such as steps added, renamed or removed, lines added or relabelled, answers that end a path, and a different first step, and anything worth checking, then publishes them. Staff see the new version straight away.
- Discard changes: puts the steps back to the published version, after asking you to confirm. You can’t undo this.
Changes to a workflow’s settings (name, description, icon, where it appears and whether it’s listed) aren’t part of this: they apply straight away.
Version history
Each time you publish, the version staff see is recorded. Settings lists the versions under Version history, newest first, with when each was published and by whom. The newest is marked What staff see now.
- Each version says what it changed from the one before, such as “2 steps added and 1 line changed”. Choose What changed for the full list.
- View shows a version on the diagram, as it was published. Nothing can be changed there.
- Restore puts the steps back to how they were in an earlier version, after asking you to confirm. You can also choose Restore this version while viewing one. The steps come back as changes in the working copy, which opens ready to check: staff keep seeing the latest version until you publish them. Restoring replaces any changes you haven’t published yet.
Workflows published before versions were recorded
A workflow published before version history existed has no versions yet. The first time someone changes it, the steps staff are seeing are recorded as version 1, so the change waits in a working copy like any other.
Engagement
Open Engagement at the top right of the Workflow Guidance page. It shows:
- total workflow views for the last 7 days and the last 30 days
- Most viewed workflows in the last 30 days
- Recently viewed workflows
- Usage by staff for the last 30 days: views per person and when they last viewed a workflow
If a workflow is rarely used, check that it’s listed under Everyday if staff need it daily, or link to it from a handbook page. The figures are there to show where support or training might help, not to monitor individuals. For figures across all modules, see Analytics and engagement.